Wednesday, January 20, 2010

Christine Jonson Princess Wrap top

I just finished this a couple of days ago.  At first I was hestitant about the fabric but after wearing it today, all is good.  Knit/lycra blend from fabric.com.  This picture isn't the best, the stomach area of the shirt looks, well, poochy.  It lies flat and has great lines, but the fabric is a heavier lycra blend and I think that makes the gathers not so soft and flowy.  Or it means more sit-ups and running for me!!

I have made this a couple of times before, the best one, no picture of that on my blog.  Here is the original one garment


We are doing some remodeling, opening up a wall between rooms.  So the contractor is sanding sheetrock right now.  Guess what I will be doing in an hour or so?  Cleaning is right!  In the background of my picture, you can see paint samples.  That is my project over the weekend, lots of painting.

Also, new hair look.  I am going with my natural curls, why not, easy to fix and the twins tell me I look younger.  That really is the deciding factor.

Monday, January 18, 2010

Questions and Answers

There have been a few questions in the comments, so I am going to try and answer them and I am really behind, sorry.

Meg Rose wrote on the Kwik Sew top:

I would like to learn how to do that kind of neck binding. Is it a bias trim you cut yourself?
The neckline piece is straight grain with the most stretch.  I will post a tutorial soon, maybe that will help.  It is the way my dear friend, Anne of Needle Nook Fabric, taught me.

The comments on the topstitching of my jeans and some machines don't like to do that.  I have to practice with the topstitching thread and my tension, then adjust it accordingly and write that number down.  Also, it needs tweaking a bit more, depending on the number of layers I am topstitching through.

Karen Thompson wrote on the Winners and Losers of 2009:

Love your sewing choices. Please tell me what pattern you used for the blouse with the ruffles edge cuffs. Very nice.

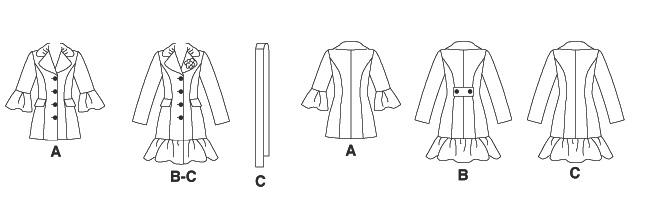
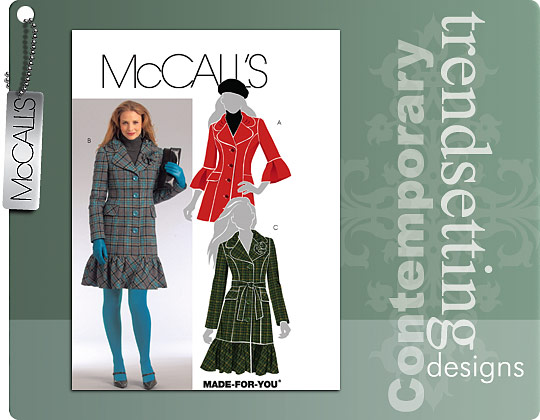
McCall's 5471 and now that I looked it up, I don't think I made it in 2009.  Oh, well, I enjoyed wearing it in 2009! 

Robyn wrote on the Cookie post (12-20)
Lori, how many cookies does the recipe make...they look fabulous!
It depends on how big you make the crescent shapes but I can usually make 40 to 50.

Joanne M wrote on the Basement Makeover post

Did you have have to patch many dings in the wall? If so,what other preparation did you do to the walls?

No ding repair, we did use a Glidden product called Gripper to prime the walls.  Also, we let this cure for 24 hours before painting with the regular wall paint.

That is it, I think.  Sorry it took me so long.

I finished my Christine Jonson top, great patten, not so great fabric.  I will take pictures tomorrow, I hope.


Sunday, January 17, 2010

Kwik Sew 3419

After the jeans and the new coat, I need a few quick and easy projects.  So knit tops here I come!  Usually, for Christmas I get some new clothes, I did this year but it was workout clothes and a pair of new boots.  My closet needs some help for the rest of winter, plus I am just getting tired of the same old things.  First up my trusty Kwik Sew 3419 with long sleeves and the knit from Fabric.com, which was a dream to sew.
Here is myoriginal review if you want to see the changes I made.

The neckline


The top, I fill out the chest better than my dressform!


I just cut out a Christine Jonson's pattern and that is my next project.

Tuesday, January 12, 2010

Jeans Are Done

Okay, they are done and they are great, in my humble opinion.  Go to this blogpost for a review of the Ottobre jeans.  The one change I did was to fold out 1/2" in the front and back, so the rise isn't so high.  Next time I will probably make this 3/4" to 1" amount.  Also, I added my first ever rivets, making my jeans very RTW.

My photographer was a bit out-of-focus on this front picture and how do you stand for this type of picture?  Oh, well, here it is:


Then the back pictures, standing a bit funny again and Meredith said, "Mom, let me get a picture of your great back pocket."  I consider that high praise, coming from a teenager.


They look a bit baggy in the rear but really they are not, I am just standing with one knee bent and I have been wearing them all day.  The only problem is the denim still is fading on my hands.  I prewashed the denim twice before cutting out the jeans and then once after completing the jeans.  My hands were so blue after sewing on this garment.

Next up, some knit tops for me.  Have a great day/evening.


Friday, January 08, 2010

Ottobre Jeans Again and My Snow Day

It was a snow day here, no school and I couldn't get to work.  So, the twins and I have had a great day.  Kaitlyn baked goodies, Meredith made cards and I scrapbooked many, many pages.  I have wedding photos to do but I need stuff for that!  Then TV time, a quick nap and then I started working on my Ottobre Jeans, a TNT pattern:
I have made these three times before

Ottobre Jeans
Ottobre Jeans #2
and I didnt' get pictures for the third pair, from a dark brown denim.

I cut these out last night and started sewing tonight.

Here is the coin pocket with rivets, first time I have used those:


Then my back pocket, excuse my chalk marks.  I drew lines 2" and 3" down from the pocket top, then traced some curved lines.


I think that is all the sewing for tonight, the girls just put in a movie and I need to go watch, no I want to go watch!


Wednesday, January 06, 2010

McCall's 5717


Description: Semi-fitted jacket, above mid-knee length has shoulder pads, princess seams, side front pockets with flaps. Pleated upper collar and sleeve variations.
Sizing: 4 to 18 with pattern pieces for cup sizes: AB, C and D. AB are together.
Instructions: The instructions were very good, as were the illustrations. I thought the lining instructions were some of the best I have seen in a pattern. I did use two of my books, High Fashion Sewing Secrets and Couture Sewing, to help with the construction.

Likes/Dislikes: I liked the lines of the jacket, the length and the pleated collar. After reading through the pattern instructions, I found the pocket construction to be quite unique.
First you sew the pocket flap and baste it to the upper side front.
Next, sew the pocket piece from fashion fabric to the upper side front (right sides together with the pocket flap sandwiched between these pieces).
Now stitch the pocket piece from lining fabric to the lower side front as shown in this picture:


Understitch

and press to the inside:

Match the pocket lining with the pocket fashion fabric, stitch pocket bag
Then you have this for the pocket:

here it is closed and it is a very nice neat pocket:


Changes: This might be hard for many of you to believe but I made a muslin for this pattern.
I was using some fabulous fabric and I did not want to make any mistakes in fitting or sizing.
I cut a size 10 in the muslin fabric with cup size AB, adding 1 inch to the sleeve length and body length. After constructing the muslin, I decided to use the C cup pattern pieces and added 2" to the sleeves, I can't stand short sleeves on a winter coat.
I emailed Pam Erny for interfacing recommendations and her reply was ProWeft for the coat and if I needed more support in the collar and lapel area, then use 2 layers. Which I did.
I used a piece of interfacing for the roll line as stated in one of the books. Added the interfacing to the hems, back, front and then the pattern pieces recommended on the pattern.
A back stay from muslin was added after interfacing and sewing the back to the side back pieces.
I probably should have used bound buttonholes for this project but I felt my skill for this technique wasn't at the level it needed to be.
Brigitte just posted a tutorial for bound buttonholes Here is the link: Brigitte's Bound buttonholes

Fabric: An incredible wool-lycra from Brigitte, after she sponsored a contest in February 2009 and I won. Also, included was a beautiful vintage lining.
Conclusion: I am so pleased with my coat. It took all of December plus the first week of January to construct but it was so worth it. A big thank you to Brigitte for selecting this fabric, it was a joy to sew.

Side view:


Pocket:


Inside pocket:


Back, I need to press the hem a bit better.


collar:


Finally, the front of the coat:


Monday, January 04, 2010

Winners and Losers of 2009

I am a little late with the year-end recap, but better late than never. I will start with the losers, this Burda blouse went out of the closet after one wearing.


This Burda lace jacket, I like it but haven't worn it. Not sure if it is me and it was such a pain to make and remake.


Here are the winners (click on the picture to see it larger). These are things I really enjoy wearing, well, not the quilt of course.


I made many basic knit tops, but as I looked back on 2009, I wish I had sewn more. Maybe 2010 will change that.

Sunday, January 03, 2010

Pictures

I have spent the last couple of days making my way through my pictures. I have done a good job of getting my pictures from my camera card to my computer but then it stops there. I have been making my way through all the files and doing a bit of work on my pictures in Photoshop. I am happy to say, I am ordering prints right now. Yea, pictures on the way but that mean scrapbooking 180 pictures, plus the stack waiting to be scrapbooked (including tons of wedding photos) on my desk area. I will get to it someday!

I wanted to share one of the pictures with you. Kaitlyn took this at the Butterfly House at Coastal Discovery Museum in July. Isn't it a beautiful picture? And it was taken with my little point and shoot Nikon.


For the most part, I have finished McCall's 5717, the wool coat and I am very pleased with it. I have to decide on buttons and then this project will be done. It took all of December and this first part of January, too much going on with the holidays and 4 birthdays in our family.

Next projects, knit tops, quick and easy for a bit.

Now a few quick resolutions:
  1. Sew More
  2. Try to scrapbook 2 pages a day until I am caught up.
  3. Menu planning
  4. And once again, Sew More