


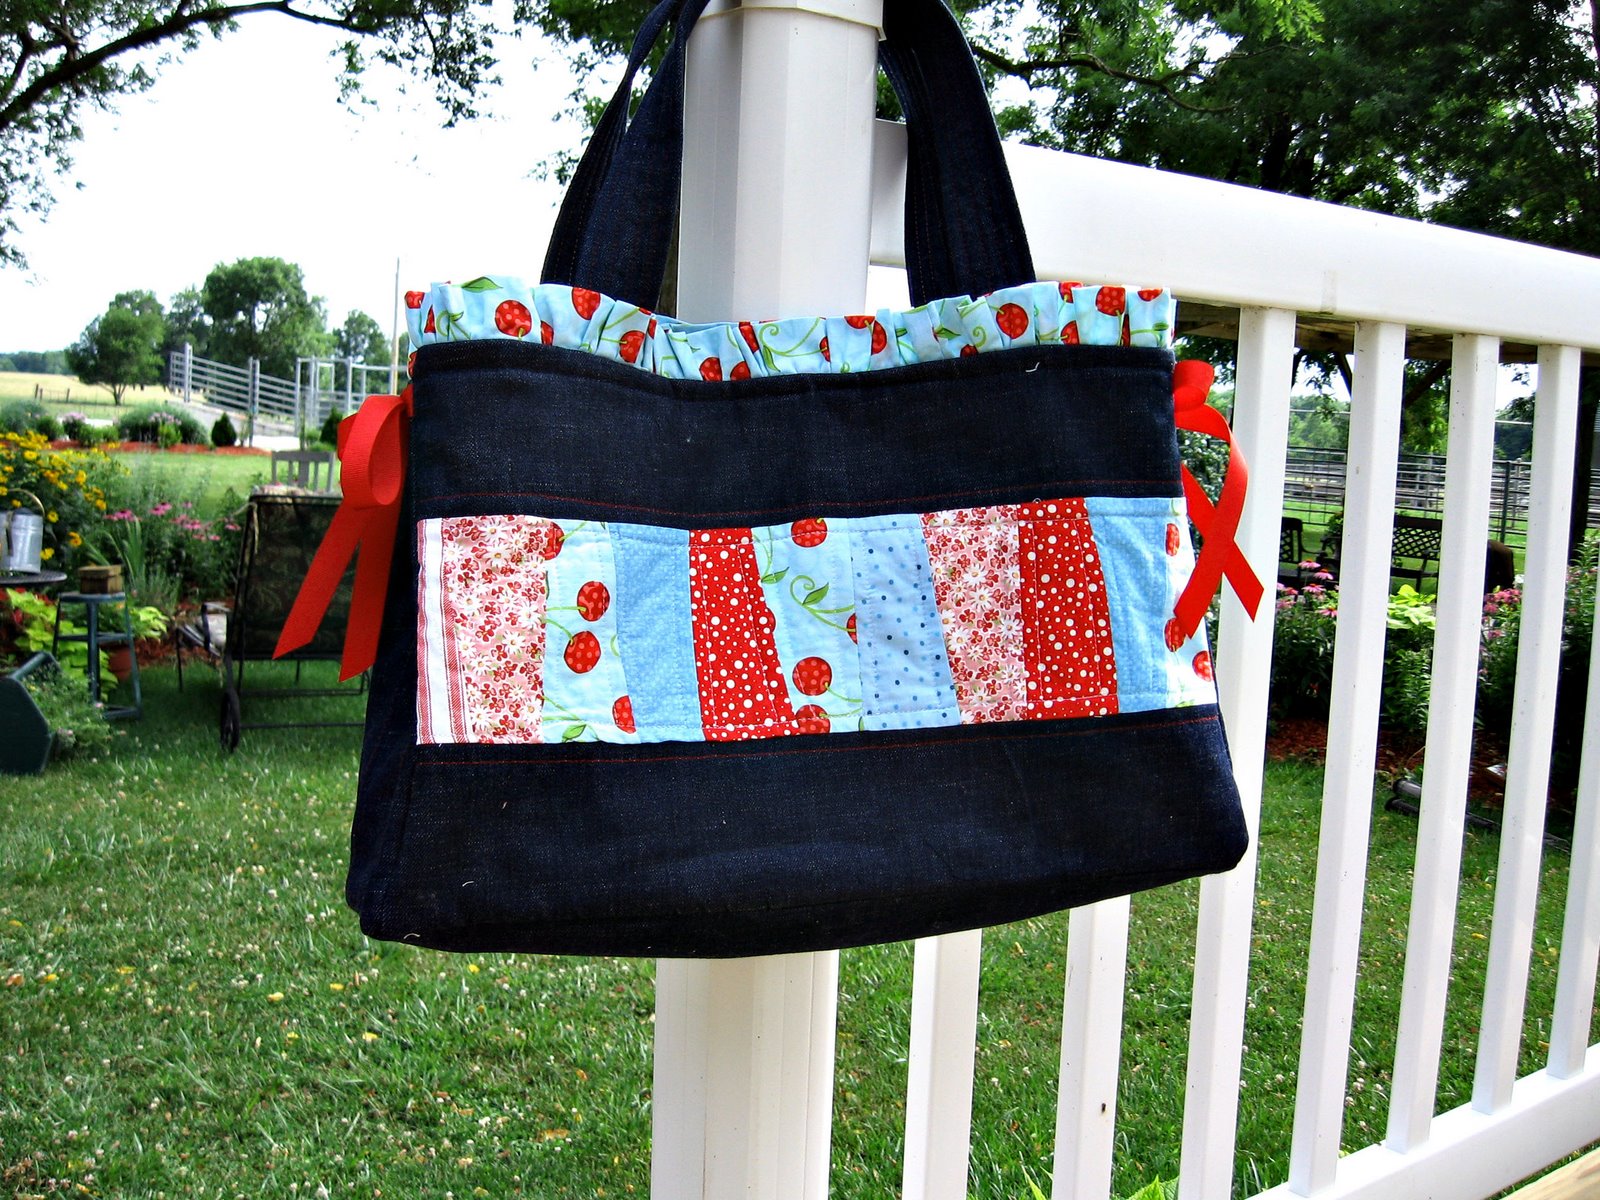
Here it is a tutorial for the Charm Pack Bag
This is a bag I started with a basic design and then developed along the way. My first one was 2007 and has gone from there.
Here is the one that started it all

July 2016 update:
I am updating this tutorial just a bit. Mainly adding some pictures of the other bags and variations I have made from this basic bag.


Variations
 |
| Fabric with a band |
 |
| One less row |
 |
| Ruffle at the top - patchwork band, solid fabric and ribbon ties |
 |
| Jelly rolls to make the pattern. |
Your supplies:
1 Yard fabric for lining, handles and ties
1 Charm Pack (5 inch squares in a precut) at least 42 in
package
1 yard Peltex for firmer bag or ¾ yard fusible fleece for a softer bag (I prefer the Peltex)
2-1/2 yards SF101 Pellon interfacing
Thread to match
Purse feet (optional)
General sewing supplies
NOTE - all seam allowances are 1/4" unless otherwise noted
Step 1 - Select
your favorite 35 charm packs and lay them out on a flat surface –
5 squares in a row and you will have 7 rows
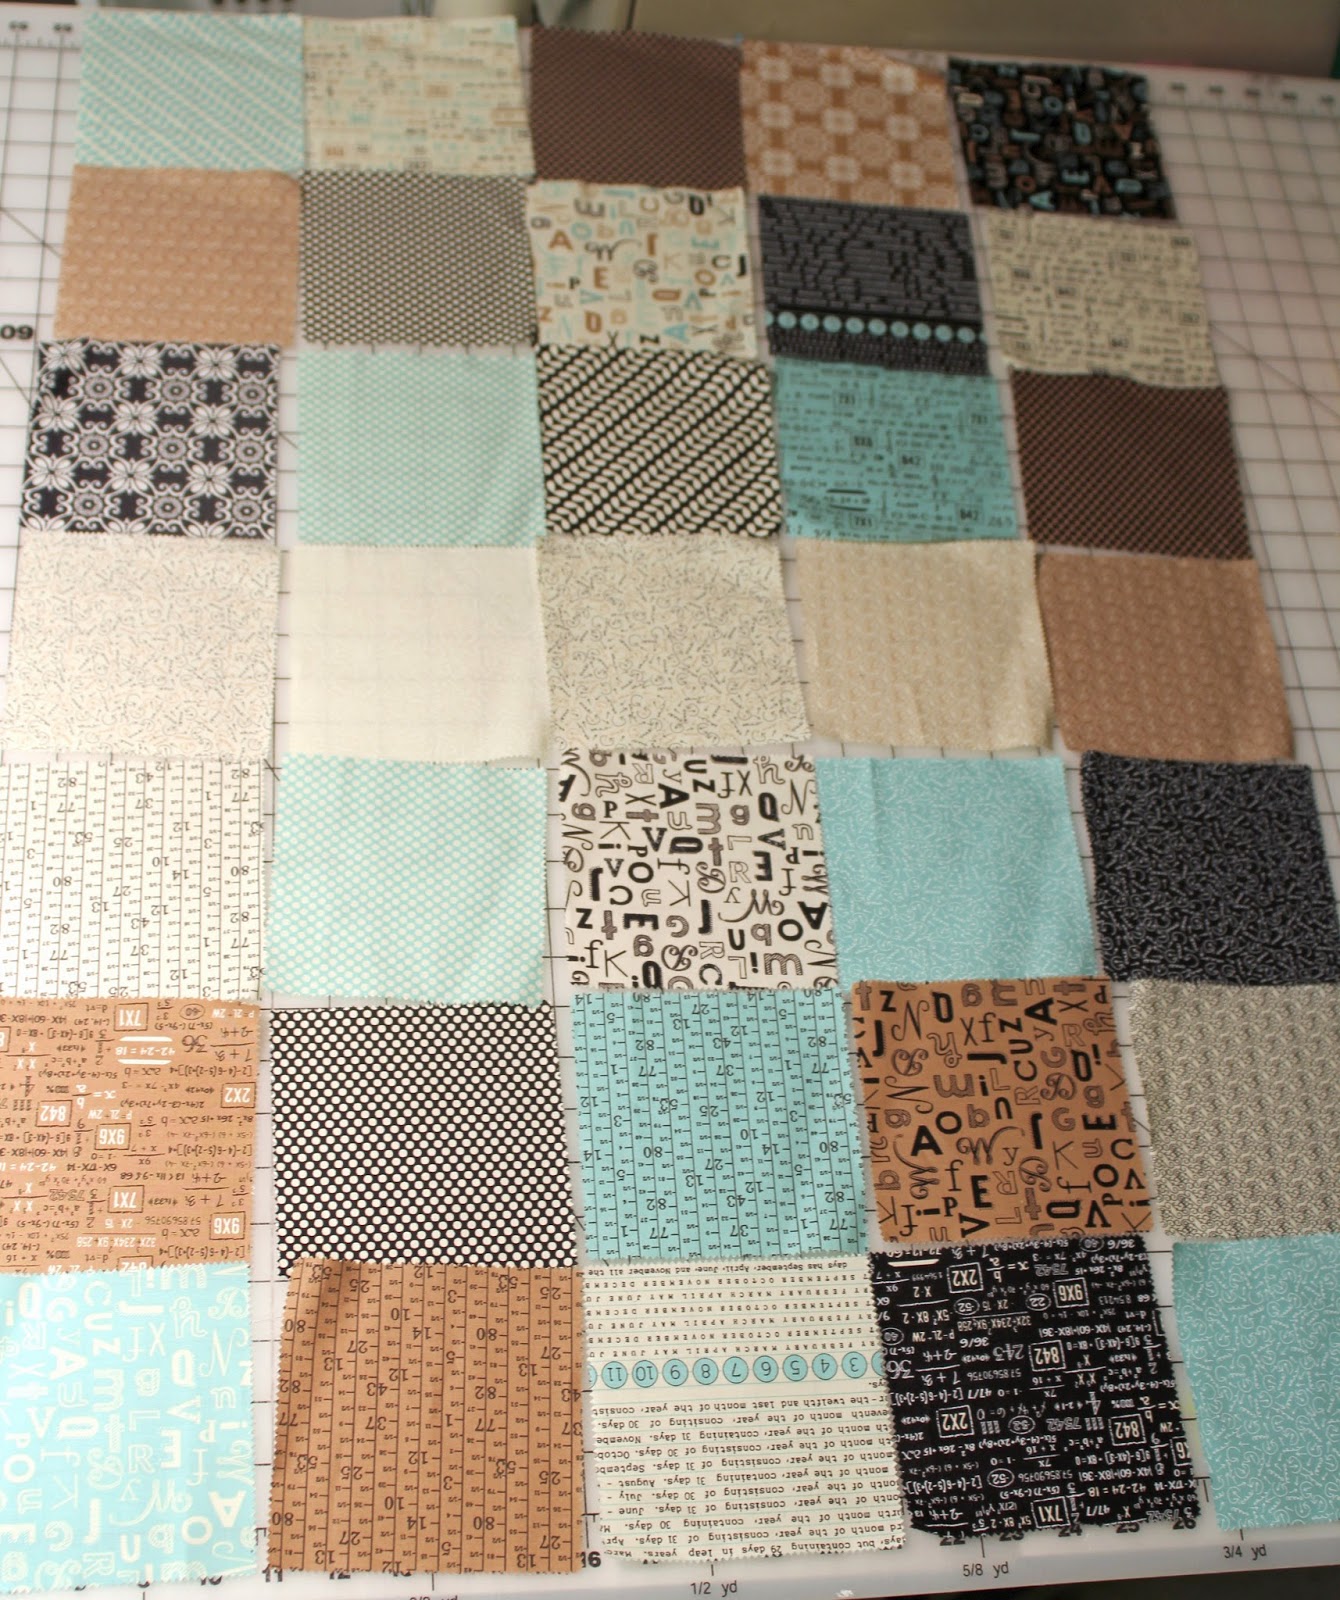
Now since we are sewing this as one large panel, side, bottom and other side some care needs to be taken with the layout and directional fabric. Here is how you need to lay out the charm packs if you are making this bag with some directional fabric. Click on the photo for a larger view. The important thing is Rows 1-3 should be facing for you to read them - Rows 5-7 will be upside down.
Hint - on Row 4- I use the prints I don't really like or colors I don't like, after all it is the bottom of the bag and you are not going to see them.

Step 2 - Sew the 5 blocks together to form the rows then sew the rows together with 1/4" seam allowance.
Hint: Press seams in each row in opposite directions making it easier to match the seams when joining rows

Step 3 - Place the sewn squares on Peltex or Fusible Fleece and cut out the Peltex or Fusible Fleece slightly larger than the pieced section

Use your preferred method to secure these two together. With the fusible fleece, you would press the two together. With the Peltex, you could use quilt basting spray, pins or safety pins.
Step 4 - Quilt the outer layer. You could do diagonally or I prefer to quilt it 1/4" on each side of the vertical seams

A close-up of the quilting:


Step 6- Cut lining - like you did for fleece/Peltex in Step 3.
Hint: If your lining is not directional cut this in one sold piece. If the fabric is directional - add 1/2" to one end of the lining, cut a the lining down the center of the bag (what would be the bottom) and seam the two sides together with the directional fabric in the correct direction.

here is what the fabric should look like after you cut the lining

Step 7 - Fuse SF101 to the back of the lining, an option is to fuse 2 layers for a stiffer lining. I only do the multiple layers of SF101 if I have used fusible fleece on the patchwook. Set lining aside for now

Step 8 - Fold the quilted bag in half, matching side seams and matching the seams of the patchwork.

Step 9 - Box Bottom - I like to press the bag so I have a mark for the center of the bottom of the bag. I match this pressed mark and the side seams, place a pin to keep this secure. Measure 2" from the corner of the bag and draw a line across the bag (see the blue mark to the left of the ruler).
Hint: Place an inch marking at the seam and this keeps the ruler straight which keeps your line straight.
Sew on this mark and repeat for other corner

Step 10- Trim the excess

Here is what the corner will look like on the right side.

This one is 4-1/2" by 17-1/2" and I cut the Peltex or Soft and Stable to this measurement


Stitch this piece of structure fabric just inside the seam allowances. Turn bag right side out

Step 12- Purse Feet, which is optional. I like to add the feet, it just keeps the bottom of the bag cleaner and it wears better.

Step 13 -Handles and ties - Cut information. From that leftover lining fabric cut like this

Handles will be 6" by width of fabric, Then cut in half - you will have two handles 6" x 21-22" long depending on WOF
Ties are 2-1/2" x 18 inches long - cut 4
If you want different widths - take the finished width you want and multiply by 4 for the cutting width
Step 14-- Handle construction

continuous piece.

Hard to see in this picure -fold handle in half with wrong sides together - it will be 3" wide and press a crease at the fold.

Open handle up and place right side on ironing board - maybe your ironing board cover will look nicer than mine! Take the outer edges and fold to the crease - repeat on each side. Press in place

Fold handle in half matching the two folds. Your handle will measure 2" wide.

Repeat for other handle
Take to sewing machine and edgestitch each long side on both handles

Hint: -if your fabric is not directional you can sew the handle up in one long piece and then cut in half for the two handles after edgestitching
I also will measure the handles against each other to make sure they are the same length.
Step 15 - attach the handles - on each square left and right of the middle square. Measure to center and stitch in place on bag. I like to stitch back and forth several times to secure these handles to the bag.

On this picture you can see my directional handles (upside down in the picture because of placement but going in the correct direction)
Hint: Pin handles on both side of the bag and then hold the bag top together. You are checking to see if the handles on each side of the bag are pinned the same. Also, make sure your handle isn't twisted. It is no fun unsewing much of the bag to correct this, yes, ask me how I know this!
Step 16 - Ties - construct like the handles (Step 14) but we want to finish one of the ends, so fold in one end 1/4". You will also, edgestitch 3 sides on all 4 ties - the two long ends and the one short end (folded under end)
Step 17 - Attaching the ties
I pin the side with the unfinshed edge to the 2nd block from the side seam and the top row. Place the unfinished edge right at the seam between block 1 and 2 (top row). I stitch at 1/4".

Trim the seam allowance and fold the tie over the seam. Then topstitch over the folded piece -this keeps it in place and hides the seam. I like to do the topstitching to follow the seam line. Repeat for the other 3 ties.

Step 18 - inside pocket
Select 6 charm squares - you will only have 1 leftover!
arrange the squares 2 in a row and 3 rows and sew together.

Fold pocket in half Right sides together- middle row will be the half mark, sew the side seams and bottom leaving an opening for turning.
Turn the pocket, press and edgestich the upper edge.
Finished pocket:

Attach to the lining. I place my ruler at the top of the lining at 3" and place the pocket which should be centered on your lining. Stitch pocket in place.

Step 19- Sew lining like you did the outside of bag except leave a 4-5" opening for turning - See steps 8, 9 and 10
Step 20 - Place the finished bag (which is right side out) into the lining (which is wrong side out). Match the top of the lining to the bag, Make sure the side seams match and pin all around the top. Sew a generous 1/4" to 1/2" around the top. I like to do this to make sure everything is caught in the seam. Turn right side out through opening in lining
Step 21 - Press the opening and stitch in close.

Step 22 - Press the top of the bag with the seam going to the lining

Step 23- Place lining inside of bag, press, topstitch 1/2" away from the top edge and you are finished. Here is a picture of the finished topstitching.

A few more hints:
- You can change the order of construction to help with limiting your thread changes - in this bag - I did the pocket before the handles so I could keep the cream thread in and then change to black.
- on the final topstiching you can use one thread on the top and one in the bottom. In this bag I used cream through the needle and black in the bobbin.
- I like to use dark fabric for the handles - shows less dirt.
- I like to give the side seams and bottom a good press. I feel this gives the bag a definite shape
.jpg)
Hope if you enjoy this tutorial and know that this pattern and bag has been developed and changed over almost 10 years.

Great tutorial! Thanks so much.
ReplyDeleteGood Day To You All
DeleteHere we are to provide you Legit Tools, Fullz, Tutorials, Dumps etc
Contact 24/7
@killhacks : ICQ/Tel.gram
peeterhacks : Wickr/Skype
CC Fullz with SSN Info
Dumps with/without Pins Track 101/202
High Credit Scores Fullz
SSN+DOB+DL Fullz
Business EIN Fullz
Tax Return Filling Fullz
Fullz for SBA/PUA/UI
Office365 Logins/Leads
I.P's/Proxies
Combos in bulk
Photo ID's/Passports
DL Scan's
TOOLS & TUTORIALS
Carding Tools & Tutorials (Cashout, Transfers, Deposits)
Spamming Complete Package (Tools, Guides, Tutorials, Ebooks, Video Tuts)
Ha-cking Stuff with All Required Tools, Operating System, Tutorials
SMTP's/RDP's/C-Panel's/Shells
Mailer's/Sender's/SMS Spoofing, Bombing
Kali Linux Master Class Complete
D**P/Da*K Web Complete Course
Fr**D Bi**e 2021/2022
RAT's/Vir-uses/Key-loggers
PayPal/Coinbase/Amazon/E-bay Logins
SQLi Injector/Penetration Testing
Huge stuff available
Will be provided on demand
Bulk Fullz Available in cheap price
Contact anytime, available 24/7
Replacement available for invalid stuff
Serious Buyers will welcome
Discounts available on packages
Hit me Up
Tel.Gram : @leadsupplier
IcQ : 752822040
Skype/Wickr : peeterhacks
I recently ran into a serious issue with my cryptocurrency account that left me unable to access my bitcoin wallet. After several failed login attempts and repeated blocks from the system, I began to worry that I might lose access to my $415,000 permanently. Determined to fix the problem, After spending hours reading a review of GREAT WHIP RECOVERY CYBER SERVICES, on how they successfully assisted countless individuals in similar situations as mine. The process was stressful, but eventually the issue was resolved and I was able to regain access to my bitcoin wallet account. I’m immensely grateful to GREAT WHIP RECOVERY CYBER SERVICES for their incredible work, for those who need help, you can contact through the following channels:
DeletePhone Call: +1(406)2729101
Mail: greatwhiprecoverycyberservices@proton.me
What a great bag! Thanks for the tutorial!
ReplyDeleteFor sewing fans of all skill levels, this Charm Pack Bag – Tutorial provides a step-by-step tutorial on how to use charm squares to create a fashionable, handcrafted bag. Even though crafting is a fantastic method to unwind, kids who are working on challenging school assignments frequently require additional assistance. Custom thesis helpers can aid with that by offering professional advice to make the thesis writing process easier and more manageable.
DeleteBeautiful bag, Lori! Thanks so much for taking the time to do the tutorial!
ReplyDeleteBeautiful - Do you remember what fabric collection you were using?
ReplyDeleteLove it, have two people in mind to make them for.
ReplyDeleteThank you for sharing this tutorial. I am just learning to quilt, this may be above my current skill level, but I do love this bag so much. There are so many different bags to be made, but this one is much more my style. I can't wait to gain the courage to try this pattern, I have all the materials, but I don't want to mess up too badly!
ReplyDeleteYou sound a lot like the voice inside my head. You can do it Laura. It's probably easier than you think! Give it a go! You'll be glad you did!
ReplyDeleteYou sound a lot like the voice inside my head. You can do it Laura. It's probably easier than you think! Give it a go! You'll be glad you did!
ReplyDeleteYou sound a lot like the voice inside my head. You can do it Laura. It's probably easier than you think! Give it a go! You'll be glad you did!
ReplyDeleteHi There,
ReplyDeleteI have a quick question please. Where it says cut the lining the same as you cut the fleece in step 3, does that mean we cut the lining slightly bigger than the quilted piece or the same size? Great tutorial, many thanks xx
I believe meeting you Dr Benjamin on the internet is the best miracle of my life, It came as a fairytale to me when I saw numerous testimonies on how he had helped a lot of people win the lottery jackpot by giving them the winning numbers so I decided to give it try by reaching out to him, I explained to him what I wanted and he assured me that he's a specialist on all kinds of spell that he's gonna help me win the Mega Million jackpot as he has always done for others, I believed him and follow all the instructions and processes he prepared for me after 48 hours he gave me the Mega Million jackpot lottery numbers and I won the jackpot of $610,000,000. I want the universe to join me to appreciate you Dr Benjamin for changing my life with his magic numbers. If you want to win the lottery jackpot I'll confidently recommend Dr Benjamin he's the best I have ever seen, here are his contact information. WhatsApp him +18588585788 or email him drbenjaminlottospell711@gmail.com
DeleteWhat size it the finished bag??
ReplyDeleteWhat an amazing tutorial, so pleased with my bag,I’m so glad i found this tutorial i had one moda charm pack left after i made a table runner in a class i go to and kept looking at it thinking what am i going to do with it as it cost so much. i didn’t want to waste it on a whim I’ve had it about 6 months and i found this brilliant and thank you so much.
ReplyDeleteI have made so many of these bags! I make them for all my granddaughter's teachers, bus drivers, piano teachers, family members, and of course myself! I've posted pictures of some of them on Instagram, and am going to post the one I just made using April Rosenthal's Orchard charm squares as soon as I finish top-stitching it. It's for a soon-to-be new grandma, and I think she will love it! Thank you for this wonderful tutorial, I think it's my all-time favorite bag to make!
ReplyDeleteP.S. I will use #girlsinthegardenpatchworktote on Instagram.
ReplyDeleteHi Lori, I appreciate the time and effort you have put into this tutorial. I really like that there is so little waste and the pattern is a great way to use a whole charm pack. The one alteration I will make is to make the ties first before sewing the side seams of the bag exterior so I can sew the ties directly into the actual side seam itself. That is not a criticsm of this tutorial but a suggestion to be considered when making this bag. Thank you.
ReplyDeleteIf you are a boarder who participates in competitions, then more than likely you will need a bag that will hold more than one board. <a href="https://www.w3onlineshopping.com/snowboard-bag/
ReplyDeleteAnother great tutorial as always you do. Planning to give this a try with a twist. Thought of using leftover material pieces, which I have got from my stitching work. And thought of adding some SVG designs as well. Would that work well?
ReplyDeleteOverabundance things is luggage that surpasses the cutoff points for weight, size, or number of pieces permitted by a specific transporter.Go to this webpage
ReplyDeleteI love this blog because it is user friendly with appreciative information.
ReplyDeletefind out here
Hello everyone, Are you looking for a professional trader, forex and binary manager who will help you trade and manager your account with good and massive amount of profit in return. you can contact MR. CARLOS ELLISON for your investment plan, for he helped me earned 12,000usd with little investment funds. Carlos Ellison you're the best trader I can recommend for anyone who wants to invest and trade with a genuine trader, he also helps in recovery of loss funds..you can contact him on his Email: carlose78910@gmail.com
ReplyDeleteVia whatsapp: (+12166263236)
I advice you shouldn't hesitate. He's great.
BEST ONLINE HACKERS
ReplyDeletehello guys my name is Kelvin Peterson I was happy I went online to look for a hacker because I didn't regret it I got $40,000 from this great hackers guys am happy my family and business is back again they do various hack
BLANK ATM CARD
PAYPAL HACK TRANSFER
WESTERN UNION HACK
MONEY HACK
BITCOIN INVESTMENT
guess I am happy I came across them they are legit am a living proof I swear they are contact them today for your hack on
www.officialonlinehacks.wordpress.com
WhatsApp: +1 (437) 703 3498
ReplyDeleteDo you need Personal Finance?
Business Cash Finance?
Unsecured Finance
Fast and Simple Finance?
Quick Application Process?
Finance. Services Rendered include,
*Debt Consolidation Finance
*Business Finance Services
*Personal Finance services Help
contact us today and get the best lending service
personal cash business cash just email us below
Contact Us: financialserviceoffer876@gmail.com
call or add us on what's app +918929509036
Am short of words for the amazing profit you helped me earn in just a week with binary options strategy am so sorry I doubted at the beginning, I invested $200 and earn $2,500 in just one week, and kept on investing more, today I am financially successful, you can contact him via email: tdameritrade077@gmail.com
ReplyDeleteVia whatsapp: (+12166263236)
I advice you shouldn't hesitate. He's great.
I saw several people testifying of making so much money on cryptocurrency within one week with the help of Mr Ray Berka, i decided to give it a try and now i am so happy to say that he is real, he helped me make over $22,000 with just a little investment in just 7 days. you can contact him today on whatsapp +17199001064, email: tradewithraymond@gmail.com. Highly recommended!
ReplyDeletePositive site, where did u come up with the information on this posting?I have read a few of the articles on your website now, and I really like your style. Thanks a million and please keep up the effective work. jute bag Singapore
ReplyDeleteThen again, individuals from colder environments mesh bags for garlics can't discover the bags so effectively lasting through the year.
ReplyDeleteChoose on the best bags & cases to take with you. You previously have a travel bag but the only tricky is you can’t find an attractive bag for your beach and pool goods.
ReplyDeleteDanke für die Anleitung der schönen Tasche
ReplyDeleteHey guys my name William is wanted to share a testimony of how a good hacker help in making my life a better one I am glad I met them guys I got $20,000USD from them guys If you are interested they perform various hack and they are legit 100%
ReplyDeleteBITCOIN HACK
PAYPAL HACK
BANK ACCOUNT HACK
WESTERN UNION HACK
BLANK HACK ETC.......
guys if you are interested in any of this contact them because they are very legit ans I trust them contact them via
email: scarletthackers@gmail.com
WhatsApp:+1 (256) 258‑9391
Contact them today and be happy
BARNESHACK INTEL is a Group of Multinational Hackers. An affiliate of Evil Corp. We make sure by all means necessary that our clients get the best of services on A PAYMENT AFTER JOB IS DONE BASIS. Rather than send money and trust Someone to fulfill your deal, you can make sure the job is done before WORKMANSHIP is paid. Excellent Customer Service AND A 100% Guarantee.
ReplyDeleteBEWARE OF FRAUDSTARS
If you have been a VICTIM,
Contact:
barneshack9@gmail.com OR kelchambers60@gmail.com for Directives.
Here, It's always a win for you.
Without any Reasonable doubts, it is no News that BARNESHACK INTEL offers one of the best Hacking Services World Wide.
Amongst other services we offer are listed as follows :
[ ] Binary Option funds recovery
[ ] Social media hack
[ ] Recovery of loan scam
[ ] Recovery of dating scam
[ ] E-mail hack
[ ] College score upgrade
[ ] Android & iPhone Hack
[ ] Website design
[ ] Website hack
Etc.....
CONTACT:
Email-: barneshack9@gmail.com OR kelchambers60@gmail.com
Cell number-: +1 (502) 482-3528
BARNESHACK Intel
All rights reserved.
Copyright© 2021 Privacy Policy.
There's no doubt i would fully rate it after i read what is the idea about this article. You did a nice job.. yupoo shoes
ReplyDeleteHello ! My name is Sarah O’Brian, I am a chartered accountant and mother of four from Michigan. Some time ago I decided to invest in cryptocurrency. I invested exactly $102,000 for a start with this fake broker www.24xforex.com and was made to believe that my investment had grown from my initial deposit of $102,000 to $250,700.This felt so good as the investment grew rapidly in just a few weeks. When it was time to take my profit, my withdrawal request was denied. Later on after much vain efforts,i realized that I might never get my money back.
ReplyDeleteI discovered that i had been a victim of cryptocurrency scam.
My boss at work noticed how frustrated I was so I had to open up to him about my encounter with scammers. He linked me up with with Phoenix Cyber Corp. and to my greatest surprise my lost funds was recovered directly to my wallet address in less than 24hours. I don’t know how they did it but it was amazing.
Phoenix Cyber Corp. is a financial regulator and fund recovery body. They warned that these types of scams involving bitcoins and other cryptocurrencies or fake merchants are becoming common lately and targeted victims come from different parts of the world.
I am sharing this to save someone out there from a lifetime disaster.
You can contact these group of Ethical Hackers at cyberprecinct@gmail.com
Thanks
I just have to introduce this hacker that I have been working with him on getting my credit score been boosted across the Equifax, TransUnion and Experian report. He made a lot of good changes on my credit report by erasing all the past eviction, bad collections and DUI off my credit report history and also increased my FICO score above 876 across my three credit bureaus report you can contatc him for all kind of hacks . Email him here via Email him here via hackintechnology@gmail.com or whatsapp Number: ++1 410 635 0697.
ReplyDeleteFew Months ago, I felt so depressed, got frustrated dealing with bad credits, but reaching out to HACK VANISH via Phone: +1 (747) 293-8514 and Email: HACK VANISH (@) GMAIL. COM gave my life a new meaning, after I found him credible through positive reviews read on some credit blogs, in a twinkle of an eye, this great hacker restored my credit score from 509 to 784 across all 3 major credit bureaus, evictions and repossession cleared, my LexisNexis and Chex system fixed respectively, some days later, I received an E-mail confirming the approval of my home loan, it was quite amazing because I never thought it was possible. Today, I can confidently say 2021 was an exceptional year for my husband and I as we now own a new home and a brand-new SUV courtesy HACK VANISH, I would definitely recommend him to anyone in need of a genuine Hacker.
ReplyDeleteWelcome. BE NOT TROUBLED anymore. you’re at the right place. Nothing like having trustworthy hackers. have you lost money before or bitcoins and are looking for a hacker to get your money back? You should contact us right away. It's very affordable and we give guarantees to our clients. Our hacking services are as follows:
ReplyDeleteEmail:Creditcards.atm@gmail.com
-hack into any kind of phone
_Increase Credit Scores
_western union, bitcoin and money gram hacking
_criminal records deletion_BLANK ATM/CREDIT CARDS
_Hacking of phones(that of your spouse, boss, friends, and see whatever is being discussed behind your back)
_Security system hacking...and so much more. Contact THEM now and get whatever you want at
Email:Creditcards.atm@gmail.com
whats app:+1(305) 330-3282
WHY WOULD YOU NEED TO HIRE A HACKER??:
There are so many Reasons why people need to hire a hacker, It might be to Hack a Websites to deface information, retrieve information, edit information or give you admin access.
• Some people might need us To Hack Their Target Smartphone so that they could get access to all activities on the phone like , text messages , call logs , Social media Apps and other information
• Some might need to Hack a Facebook , gmail, Instagram , twitter and other social media Accounts,
• Also Some Individuals might want to Track someone else's Location probably for investigation cases
• Some might need Us to Hack into the Court's Database to Clear criminal records.
• However, Some People Might Have Lost So Much Funds With BINARY OPTIONS BROKERS or BTC MINING and wish to Recover Their Funds
• All these Are what we can get Done Asap With The Help Of Our Root Hack Tools, Special Hack Tools and Our Technical Hacking Strategies Which Surpasses All Other Hackers.
★ OUR SPECIAL SERVICES WE OFFER ARE:
* RECOVERY OF LOST FUNDS ON BINARY OPTIONS
* Credit Cards Loading {Any country}
* BANK Account Loading {Any country}
★ You can also contact us for other Cyber Attacks And Hijackings, we do All ★
★ CONTACTS:
* For Binary Options Recovery,feel free to contact (Creditcards.atm@gmail.com)for a wonderful job well done,stay safe.
IT HAS BEEN TESTED AND TRUSTED
BE NOT TROUBLED anymore. you’re at the right place. Nothing like having trustworthy hackers. have you lost money before or bitcoins and are looking for a hacker to get your money back? You should contact us right away. It's very affordable and we give guarantees to our clients. Our hacking services are as follows:
ReplyDeleteEmail:Creditcards.atm@gmail.com
-hack into any kind of phone
_Increase Credit Scores
_western union, bitcoin and money gram hacking
_criminal records deletion_BLANK ATM/CREDIT CARDS
_Hacking of phones(that of your spouse, boss, friends, and seeing whatever is being discussed behind your back)
_Security system hacking...and so much more. Contact THEM now and get whatever you want at
Email:Creditcards.atm@gmail.com
★ OUR SPECIAL SERVICES WE OFFER ARE:
* RECOVERY OF LOST FUNDS ON BINARY OPTIONS
* Credit Cards Loading {Any country}
* BANK Account Loading {Any country}
★ You can also contact us for other Cyber Attacks And Hijackings, we do All ★
★ CONTACTS:
* For Binary Options Recovery,feel free to contact (Creditcards.atm@gmail.com)for a wonderful job well done,stay safe.
Thanks to bloggers like you and experts at Coursework Writing Services, my life is going very well. I would never want you to stop blogging. Keep up the good work like this.
ReplyDeleteA charm pack is a small fabric square that is used to make quilts. The squares are usually about 5 inches by 5 inches, and they are sold in packs of 42 or more. The squares are typically made from cotton or cotton blend fabrics, and they often feature prints and designs that are related to each other. Charm packs can be used to make a variety of quilt projects, including baby quilts, table runners, and pillows. Wholesale Swimwear
ReplyDeleteI am a living testimony of change. I can safely say that i have been blessed and my life transformed from being just a company attendant to a business owner all in the space of 1 month after i got my return on investment from davidbenjaminexptrader@outlook.com I did try some other trader but i got scammed. I am using this medium to reach out to the world for those who got plans to go bigger and better in life to contact this company via davidbenjaminexptrader@outlook.com or on WhatsApp +1 408 500 0775
ReplyDeleteasap for certified and trusted services.
I just need to say this is a well-informed article which you have shared here about hoodies. It is an engaging and gainful article for us. Continue imparting this sort of info, Thanks to you. Fibc Jumbo Bag
ReplyDelete
ReplyDeleteHOW I MADE THOUSANDS OF DOLLARS WITH $1,000 VIA BITCOIN TRADING EXPERT
It's been more than a month of constant happy returns from all the investments I have made with David Benjamin after a saw a review on Quora. My first investment of $1,000 got me $9,300 in an amazing few days. I saw a few reviews on here and decided to add mine to guide and inspire someone to make that right decision to invest and trust this expert trader with skills and enhanced software to navigate the market. Contact on davidbenjaminexptrader@outlook.com or on WhatsApp +1 408 500 0775
Vi var en familie, som ikke før havde været på indisk restaurant. Da vi ankom indisk mad ballerup blev vi mødt af en yderst venlig tjener. Da vi havde bestilt drikkevarer fulgte han os til buffeten og forklarede hver enkelt ret og hvad der passede sammen med hvad. Der var krav om brug af engangshandsker i buffeten. Stort plus i COVID-19 tid.
ReplyDeleteAwesome information here I am so gleeful when i found your weblog while I was researching on Bing for something else,but believe me the way you interact is literally awesome I do respect that so much. I will instantly get your rss and stay informed of any updates you make and as well take the advantage to share some vital information regarding. how to get dry seahorse
ReplyDeleteThis comment has been removed by the author.
ReplyDeleteHack and take money directly from any ATM Machine Vault with the use of ATM
ReplyDeleteProgrammed Card which runs in automatic mode. email
oscarwhitehackersworld@gmail.com
whatsapp..+1(510)-777-9243 or call/Text him +1(510)-984-6924
So incredibly beautiful and heartwarming! This blog is very short and well written not consuming any time to read. this is such a helpful post thank you. how-long-does-it-take-to-become-a-canadian-citizen ,I will also take the advantage to ask for your permission to join our TELEGRAM GROUP
ReplyDeleteHey friend, it is very well written article, thank you for the valuable and useful information you provide in this post. Keep up the good work! FYI, why do cats head butt
ReplyDelete,Credit Card processing, IKIGAI book pdf download,my favourite movie
HAVE YOU LOST YOUR MONEY TO BINARY OPTION SCAM OR ANY ONLINE SCAM WHATSOEVER?.DO YOUR DESIRE CREDIT REPAIR[EQUIFAX, EXPERIAN, TRANSUNION? WELL, YOU HAVE FOUND REDEMPTION.
ReplyDeleteBEWARE OF FRAUDSTERS looking to hoax.
if you have been a VICTIM, contactEmail:creditcards.creditscoreupgrade@gmail.com
whatsapp:+1(437) 536-6082 for directives.
Here, it's always a win for you.
��OUR SERVICES��
∆Binary Option funds recovery
∆Social media hack
∆Recovery of loan scam
∆Credit repair (Equifax,Experian,Transunion)
∆Email hack
∆College score upgrade
∆Android & iPhone Hack
∆Website design
∆Website hack
∆And lots more.
We have specially programmed ATMs that can be used to withdraw money at ATMs, shops and points of sale. We sell these cards to all our customers and interested buyers all over the world, the cards have a withdrawal limit every week.
CONTACT INFO:
Email:creditcards.creditscoreupgrade@gmail.com
whatsapp:+1(437) 536-6082
Copyright ©️ 2022.
Question.. The peltex only comes in 20inches wide. If doing 5 5x5 squares across with seam allowance that makes it 22 inches wide. Do you have to sew together two pieces of peltex?
ReplyDeleteI am thankful for the blog post. Really looking forward to read more. Great.
ReplyDeletehttps://canvas-school-e52f.thinkific.com/courses/your-first-course
Thank you for sharing this detailed tutorial! I've just pieced the outside of my new school bag - I'm a 4th grade teacher. I had a quick editing suggestion - step 9 that says match up side edges - I'm assuming you mean to stitch it. Can't wait to finish and show off my new bag!
ReplyDeleteDon't forget to take a look at this amazing insulated backpack - stylish and comfy!
ReplyDeleteNice post, I bookmark your blog because I found very good information on your blog, Thanks for sharing.
ReplyDeleteMeat Masala
This is unbelievable, at first I never actually built any interest in this Binary/Forex trading of a thing but when I later gave it a try with the Help of this wonderful Expert Trader Mr Mark Toray, it was a successful trade for me. All i did was to invest $550 into my first trading and to my greatest surprise, I received a huge amount of $6,520 as profit in 7 days of trading... Mr Mark Toray was the trader that made it possible and he is still doing it all for me.. You want to be happy and be free like me do well to reach out to her via Whatsapp +1 (301) 410‑5007, Email: Marktoray8@gmail.com, Telegram: @Mark4toray_fx
ReplyDeleteGood Day To You All
ReplyDeleteHere we are to provide you Legit Tools, Fullz, Tutorials, Dumps etc
Contact 24/7
@killhacks : ICQ/Tel.gram
peeterhacks : Wickr/Skype
CC Fullz with SSN Info
Dumps with/without Pins Track 101/202
High Credit Scores Fullz
SSN+DOB+DL Fullz
Business EIN Fullz
Tax Return Filling Fullz
Fullz for SBA/PUA/UI
Office365 Logins/Leads
I.P's/Proxies
Combos in bulk
Photo ID's/Passports
DL Scan's
TOOLS & TUTORIALS
Carding Tools & Tutorials (Cashout, Transfers, Deposits)
Spamming Complete Package (Tools, Guides, Tutorials, Ebooks, Video Tuts)
Ha-cking Stuff with All Required Tools, Operating System, Tutorials
SMTP's/RDP's/C-Panel's/Shells
Mailer's/Sender's/SMS Spoofing, Bombing
Kali Linux Master Class Complete
D**P/Da*K Web Complete Course
Fr**D Bi**e 2021/2022
RAT's/Vir-uses/Key-loggers
PayPal/Coinbase/Amazon/E-bay Logins
SQLi Injector/Penetration Testing
Huge stuff available
Will be provided on demand
Bulk Fullz Available in cheap price
Contact anytime, available 24/7
Replacement available for invalid stuff
Serious Buyers will welcome
Discounts available on packages
Hit me Up
Tel.Gram : @leadsupplier
IcQ : 752822040
Skype/Wickr : peeterhacks
Really appreciate you sharing this article post. Much thanks again. Really Cool.
ReplyDeletecheck more info about canvas bag
হাই বন্ধুরা কেমন আছেন। আপনারা যদি ফেইসবুক এ পোস্ট করার জন্য হাসির স্ট্যাটাস খুজে থাকেন তাহলে এখান থেকে নিতে পারেন। এখানে অনেক মজার মজার স্ট্যাটাস রয়েছে। এগুলো নিজের টাইমলাইনে অথবা বিভিন্ন গ্রুপে পোস্ট করে মানুষকে হাসাতে পারেন। আশা করি আপনাদের অনেক ভালো লাগবে।
ReplyDeleteSolo travelling requires much planning. you have discussed amazing some points and guides for solo travelling. Great stuff. Keep posting.
ReplyDeleteTHB Hotel UK Discount Codes
Fullz/Pros/Leads
ReplyDeleteSSN DOB
SSN DOB DL
High CS Fullz
Fresh Spammed CC's
MAny other leads & stuff
Spamming, Hacking, Carding Stuff
Legit stuff with Guarantee
Loan methods/Carding methods
All Hack Tools
Tutorials
Mailers
Brutes
& many more
What's app +92 317 2721122
Tele.gram @leadsupplier
ICQ 752822040
exploit.Tools4U AT GMAIL (DOT) COM
This days it’s actually hard to trust men, so what I do is I keep an eye on my husband 24/7 with the help of HACK JUDAS. with this hacker
ReplyDeleteI got all access to my husband social media remotely that is to say I monitor my husband every calls, listen to his calls and all messages that comes
from his phone right in my cell phone. This is indeed a perfect way to catch a cheat you can contact them with their email: hackerjudas9@gmail.com or whatsapp +19124053415
ReplyDelete<<<I lost my job few months back and there was no way to get income for my family, things was so tough and I couldn’t get anything for my children, not until a met a recommendation on a page writing how Mr Bernie Wilfred helped a lady in getting a huge amount of profit every 6 working days on trading with his management on the cryptocurrency Market, to be honest I never believe it but I took the risk to take a loan of $2000. and I contacted him unbelievable and I was so happy I earn $22,500 in 6 working days, the most joy is that I can now take care of my family I don’t know how to appreciate your good work Mr. Bernie Doran God will continue to bless you for being a life saver I have no way to appreciate you than to tell people about your good services. For a perfect investment and good strategies contact Mr Bernie Doran via Telegram : @Bernie_fx or Email : Bernie.doranfx01@gmail.com
This comment has been removed by the author.
ReplyDeleteThank you for sharing such a fantastic tutorial. Your passion for sewing and your willingness to share your knowledge and expertise truly shines through. I'm inspired to give this project a try and create my very own charm pack bag.Dissertation Writing Services UK
ReplyDeleteHELLO!!! I wanted to share an incredible story of a successful Bitcoin recovery. William Mercado's recovery team, a determined investor[John], recently experienced a devastating loss when his digital wallet was hacked, resulting in the theft of a significant amount of Bitcoin.
ReplyDeleteRefusing to accept defeat, John assembled a team of experts in cybersecurity, forensics, and blockchain technology. Through their relentless efforts, they meticulously traced the hacker's transactions and identified dormant wallets associated with the theft.
After hours of legal battles with the right tools, law enforcement licence and technical challenges, Mr WILLIAM's team successfully froze the hacker's assets and reclaimed the stolen Bitcoin. This remarkable recovery serves as a powerful reminder of the resilience and ingenuity within the cryptocurrency community.
CONTACT info; William-Mercado@cyber-wizard.com
Steve Hacker has my heartfelt gratitude for his incredible assistance in overcoming my cryptocurrency challenges. His knowledge and proficiency in the world of cryptocurrencies are truly outstanding. Taking the time to comprehend my situation, Steve offered practical advice and helped me navigate the complexities. A reliable professional, Steve is passionate about helping others succeed in the crypto space. If you're facing crypto-related hurdles, don't hesitate to contact him on Gmail: hackersteve911@gmail.com
ReplyDeleteAfter losing $60k to this binary crypto investment in 2022, I didn’t think I’d ever trust any form of crypto investment platform again. Luckily for me I was able to recover the funds through this incredible Hacker Steve who understands everything about the blockchain network. It was an emotional moment for me but Hacker Steve literally saved my life. He was able to pull back all my transactions. I would advise anyone in the same situation to not panic cuz digital assets can be recovered. Other assets such as stolen funds, stolen credit, lost crypto, etc. Contact Hacker Steve on Gmail: hackersteve911@gmail.com
ReplyDeleteHOW YOU CAN RECOVER YOUR LOST CRYPTO: I’m recommending Hacker Steve to anyone who has been a victim of these cryptocurrency binary investment scams. I was a victim and I am ashamed of how I lost 407,000 AUD to these people pretending to be forex and binary traders. I almost lost everything to my family until I came across Hacker Steve online, an expert in crypto recovering from these scammers. He was able to recover my money in six hours. I’m really happy sharing this out there with anyone who needs his service. You can contact him via Gmail: Hackersteve911@gmail.com | https://hackersteve.great-site.net/
ReplyDeleteThis Charm Pack Bag tutorial is a delightful guide for crafting a charming accessory. With step-by-step instructions and creative tips, it transforms the humble charm pack into a stylish bag. Elevate your crafting skills with this user-friendly tutorial, and create a chic and functional bag with a touch of charm!
ReplyDeletehttps://blog.ghostwritingfounder.com/what-does-an-editor-do-for-a-book/
My standpoint working with THE HACK ANGELS.
ReplyDeleteI share my firsthand encounters with The Hack Angels, who I met following my fall from grace in a Bitcoin fraud. I lost $640,500 to a fraudulent platform. In a desperate attempt to find a way out, I turned to Google and looked for hackers who could help me get my money back. I discovered The Hack Angels, who had excellent evaluations. After speaking with them, we decided to pay 15% for their services. The Hack Angels' situation changed, though, when they were only able to retrieve $410,300. They insisted on charging the entire 15% fee in spite of this. They insisted on the original sum, even though I offered 10%.
I paid The Hack Angels the whole sum to protect my reputation and personal information. I learned they had entered my personal devices, including WhatsApp, email, Instagram, and Facebook, but luckily I was able to contact another hacker named Hacker Jerry, who removed my information from their system. I am sharing my story to warn people about the dangers of dealing with hackers.Contact them Via ;Whats Ap; +1 520) - 200, 23 20 , Mail Box; support@thehackangels. com
Do you need hackers for hire? Do you need to keep an eye on your spouse by gaining access to their emails? As a parent do you want to know what your kids do on a daily basis on social networks ( This includes facebook, twitter , instagram, whatsapp, WeChat and others to make sure they’re not getting into trouble? Whatever it is, Ranging from Bank Jobs, Flipping cash, Criminal records, DMV, Taxes, Name it,i can get the job done. recoveryhacker101 a professional hacker with 10 Years+ experience.Contact RecoveryHacker101@gmail.com
ReplyDelete
ReplyDeleteLosing crypto online has become alarmingly common, and the sophistication of scammers is ever-increasing. Many individuals find themselves victims of scams, leaving them feeling hopeless and defeated. The emotional toll of losing hard-earned funds can be overwhelming, often leading to a sense of resignation. However, recovery is not just a distant dream; it is a tangible possibility when you reach out to the right sources. I speak from experience. Like many others, I fell prey to a scam that stripped me of my investments. Initially, I felt a wave of disbelief and shame. How could I have been so careless? The regret was suffocating, and for a while, I considered giving up on my crypto journey altogether. Yet, deep down, I knew that quitting was not an option. I realized that I needed to take action rather than wallow in despair. While searching for potential recovery options, I encountered numerous offers that seemed too good to be true. Unfortunately, many so-called “experts” were merely another layer of deception, ready to exploit my vulnerability further. It was frustrating to navigate through the myriad of scams that preyed on victims like me. But then, I stumbled upon a helpful article discussing legitimate recovery avenues. This article rekindled my hope and guided me toward finding real solutions.
DETAILS TO CONTACT FOR ASSISTANCE.
WhatsApp:+1 (740)705-0711.
Email: FOLKWINEXPERTRECOVERY @ TECH-CENTER (.) COM
Website: WWW.FOLKWINEXPERTRECOVERY.COM
Thanks,
Anne Sashikata .
HOW TO RECOVER YOUR FUNDS/BITCOIN FROM FAKE INVESTMENT BROKER !
ReplyDeleteGood day Audience, I want to use this great medium to announce this information to the public about JETWEBHACKERS few months back, I was seeking an online BTC investment plan when I got scammed for about $142,000. I was so down and didn?t know what to do until I came across a timeline about JETWEBHACKERS, so I reached out to him and to my greatest surprise, they were able to recover all the funds which I had previously lost to the Devils. I am so glad to share this wonderful news with you all because it cost me nothing to announce a good and reliable Hacker as JETWEBHACKERS.
Quickly reach out to JETWEBHACKERS, on their
EMAIL:jetwebhackers@gmail.com
TELEGRAM: @jetwebhackers
At Lori Maid’G, we pride ourselves on delivering outstanding house cleaning services Milwaukee, Wi that keep your home sparkling clean and comfortable.
ReplyDeleteU Panel Bag are a lifesaver for bulk storage! Their spacious design allows for efficient packing, which maximizes space and minimizes waste. I can't imagine my operations without these sturdy bags; they truly simplify my logistics!
ReplyDeleteGreat Site, Check Out the best FIBC Bags Supplier in UK. SIMPLEX is a manufacturing and export company with a turnover exceeding USD 40 million.
ReplyDeleteHire A Hacker To Recover Lost Crypto || Best Cryptocurrency Recovery Company - Consult OPTIMISTIC HACKER GAIUS
ReplyDeleteInvestigation services, wallet recovery, and exchange recovery are among the services provided by OPTIMISTIC HACKER GAIUS. The process of recovering cryptocurrency is difficult and complicated, requiring specialized knowledge. Optimistic Hacker Gaius is a reliable and respectable business that has assisted numerous customers in getting their stolen or lost cryptocurrencies back.
Webpage ; www.optimistichackergaius.com
WhatsApp ; +44 ,737 ,674 ,05 69
Contact Email ; support@optimistichackergaius.com
Who Is The Best Cryptocurrency Recovery Company - OPTIMISTIC HACKER GAIUS
ReplyDeleteAfter going through a lot of difficult circumstances, OPTIMISTIC HACKER GAIUS was able to return the $970,000 in stolen bitcoin and Ethereum to my cryptocurrency wallets. Initially, I was defrauded by an exchange site, losing 880k to them. I attempted to hire up to three other hackers, but they stole 90k from me, leaving me bankrupt and without hope. I truly believed I had lost everything until I found OPTIMISTIC HACKER GAIUS, who saved my bacon.
Telegram......... t.me/optimistichackergaiuss
WhatsApp ……… ( +44 737 674 0569
Homepage: ……… https://optimistichackergaius.com
Contact Email;…. [ support@optimistichackergaius.com ]
I used to struggle with weeds, but these Weed mats have been a game-changer! They’re simple to use and keep my garden looking pristine. Highly recommend!
ReplyDeleteCome, let me assist you in
ReplyDelete1: Web design and development (full-stack)
2: Graphic Design
3: Video/Photo Editing
4: Virtual Assistant
5: Copywriting, Data Entry, Audio/Visual transcription
6: Game, Tutorial, Software Installation, etc.
+393511705148
Struggling with your coursework? Assignment Desk offers expert writing services with top-notch coursework help UK. Get professional assistance to ensure high-quality, plagiarism-free work that meets your academic requirements and boosts your grades effortlessly!
ReplyDeleteStruggling with your nursing dissertation? Don’t worry—expert nursing dissertation help is here! At the Assignment Desk, we provide tailored assignment help to make your academic journey stress-free. Whether you’re tackling complex research, analyzing data, or formatting your dissertation, our professionals ensure quality support at every step. With years of experience, we guarantee plagiarism-free content and timely delivery. Trust us to transform your nursing dissertation into a masterpiece. Get the guidance you deserve and achieve academic success effortlessly! Explore our services today and take the first step toward excellence.
ReplyDeleteBusiness assignments can be complex, requiring in-depth analysis and strategic planning. At Assignment Desk, we simplify this process with assignment help online, tailored to meet academic standards and deadlines. Whether it’s a case study or a detailed report, our experts ensure accuracy and clarity. With a focus on originality and quality, we help students excel in their business studies, leaving no room for errors. Choose Assignment Desk for seamless academic success.
ReplyDeleteThis is a great blog! Add more. take a look
ReplyDeleteMy sincere gratitude to Morphohack Cyber Service for helping me recover my crypto assets from the FTX exchange where my deposits of 687K worth of coins have been held for more than two months without release.
ReplyDeleteI thought my assets were gone forever as all means to withdraw from the FTX trading exchange were unsuccessful, but I was told about the services of Morphohack Cyber Services who was able to help me recover my crypto assets after I provided my wallet address and evidence of the transactions. FTX exchange has locked my account for months with no response but thanks to the services of Morphohack Cyber Service, I was able to recover my crypto assets. It’s important to do your due diligence before investing in any platform. Morphohack can be contacted via
E-MAIL:Morphohack@cyberservices.com
WhatsApp:+1 2 1 3 6 7 2 4 0 9 2
Great information! Searching for the bulk bag suppllier in UK. Visit Simplex Chemopack as it is a leading manufacturer and exporter of high-quality FIBCs, PP woven fabrics, woven bags, and PE liners.
ReplyDeleteAnyone else use a leather bag for practice putting? luxury leather golf bags
ReplyDeleteU Panel Bulk Bag is a highly efficient packaging solution designed to handle and transport heavy-duty materials with ease. Constructed using three body panels stitched to form a U-shape, this bag provides superior strength and stability for bulk storage. Ideal for industries dealing with grains, minerals, or construction materials, it ensures safe loading and unloading due to its firm structure. The U Panel Fibc Bag Exporters in Gujarat design helps maintain the bag’s shape during use, reducing the risk of tipping. Its practical design and durability make it a reliable choice for bulk material handling.
ReplyDeleteThe Polyethylene high density sheet are high-density polyethylene plastic sheets known for their strength, durability, and resistance to moisture, chemicals, and UV rays. Lightweight and versatile, they are widely used in construction, agriculture, packaging, and marine applications. HDPE Sheets are easy to fabricate, food-safe, and fully recyclable, making them a reliable and eco-friendly material choice.
ReplyDeleteThe PP Spunbond Nonwoven Fabric is a lightweight, breathable, and durable material made from polypropylene through a spunbonding process. Known for its excellent strength-to-weight ratio, it is widely used in medical, hygiene, agriculture, and packaging applications. Its soft texture, chemical resistance, and filtration properties make it ideal for products like surgical masks, disposable gowns, crop covers, and shopping bags.
ReplyDeleteExpert NDIS Consultants support participants in creating effective plans, managing budgets, and linking with the right providers, ensuring each person achieves their goals and lives more independently and confidently.
ReplyDeleteVisit:
NDIS Consultant
NDIS Certification
NDIS Verification
How to become an approved ndis auditor
how to get ndis clients
how to become an unregistered ndis provider
My name is Daniel Harris, and I’m from Perth, Australia. In early 2024, I fell victim to a fake crypto mining company called Aurum Mining Solutions. They looked professional, they had a sleek website, convincing consultants, and even fake ASIC credentials. I invested gradually, and over time, I put in a total of $87,000 AUD, thinking my profits were growing.
ReplyDeleteThen one day, the website disappeared. The consultant vanished. I couldn’t log in or get answers. It was crushing, I had been completely scammed.
I reported it to the authorities, but I didn’t expect anything to come of it. Then I heard about Morphohack Cyber Services. I reached out, and they were incredible fast, professional, and honest. They tracked the stolen Bitcoin and helped me recover everything I lost.
Most people never see their money again after a crypto scam, I’m lucky I found Morphohack. They gave me a second chance and proved that real recovery is possible.
E-Mail: Morphohack@cyberservices.com
Excellent Blog. Explore the best bulk bag suppllier in UK. Simplex Chemopack is a leading manufacturer and exporter of high-quality FIBCs, woven bags, and packaging solutions, delivering reliability and innovation to global markets.
ReplyDeleteKeep up the excellent work! Your blog is a true gem, Insulation Removal Victoria, BC
ReplyDeleteUse these detailed instructions to make a fashionable and useful charm pack bag. This article explains all the necessary methods for transforming pre-cut fabric squares into a completed item, regardless of your level of sewing experience. Perfect for enthusiasts who like methodical procedures, much like a report writer arranges information in comprehensible formats. This is ideal for people who like jobs that need attention to detail since it combines creativity and accuracy.
ReplyDeleteHarnessing the power of the can be an invaluable tool for recovering lost or inaccessible Bitcoin. This innovative technique, developed by renowned cryptography expert, provides a highly effective method for regaining access to Bitcoin wallets and accounts that have become locked or compromised. At the heart of the Hack is a sophisticated algorithm that can analyze the complex blockchain data and transaction histories associated with a Bitcoin address, identifying potential vulnerabilities or weak points that can then be exploited to bypass security measures and restore control. The process is lightning-fast, often recovering access to a lost wallet in a matter of minutes, making it an essential resource for Bitcoin users who have found themselves locked out of their funds due to forgotten passwords, hardware failures, or other unforeseen circumstances. Leveraging advanced cryptanalysis and blockchain forensics, the hack meticulously probes every aspect of a Bitcoin account, uncovering hidden pathways and hidden vulnerabilities that can be leveraged to regain access even in cases where traditional recovery methods have failed. For Bitcoin holders facing the distressing prospect of permanently lost funds, cryptoguruteq represents a lifeline, a powerful tool that can restore access and retrieve those precious digital assets, allowing users to reclaim what is rightfully theirs. For more information, contact: Email: CryptoguruteQ via Gmail•com
ReplyDeleteWhat a great tutorial — simple yet so stylish! I love how you’ve broken down each step, especially choosing your lining and handling the zippers. Makes the process feel really doable. Thanks for sharing — this charm pack bag is definitely going on my to-sew list!
ReplyDeleteNavigating the complexities of an MBA dissertation can be daunting, but New Assignment Help UK offers expert MBA Dissertation Help UK to ensure your academic success. Our specialized service is tailored to meet the unique needs of MBA students, providing comprehensive support from topic selection to final submission. With a team of experienced academic writers, many holding advanced degrees, we deliver high-quality, customized dissertations that align with your university’s guidelines and academic standards.
ReplyDeleteLoan offer.
ReplyDeleteDo you need a loan? private loan? Business loans? A mortgage loan? Agricultural and project financing? We offer all types of loans at 2% interest rate! Contact e-mail: dakany.endre@gmail.com
Get University Assignment Help with unlimited revisions by our experts.
ReplyDeleteFULLZ Accessible
ReplyDeleteSSN DOB
SSN DOB DL
High CS Fullz
SSN DOB DL Address Employee & Bank Info (USA)
SIN DOB DL Address MMN Email Phone (CANADA)
NIN DOB DL Address Sort Code Email (UK)
Fullz For USA UK CANADA SPAIN AUS Germany
Bank Statement with W-2 Forms
DL Front back selfie and ssn
young age Fullz 2011-2024
USA Passport Photos
Fullz With DL Issue & Expiry Dates
Business EIN Company Pros
Fullz for (FASFA|Uber|Doordash|SBA|PUA|UI)
CONTACT US
..Tele gram = @ Malisa72
Dumps with CVV & Tutorials of Cahsing out
Utilities Bill & Bank Statements
Sweep Stakes|Casino & Crypto Leads
#FULLZ #SSNFULLZ #SSNDOBDLFULLZ #UKFULLZ #UKLEADS #UKNINFULLZ #CANADAFULLZ
#CANADALEADS #CANADASINFULL #CCDUMPS #CVVSHOP #SELLCVV #PAYDAYLEDS #CRYPTOLEADS
#CASINOLEADS #SWEEPSTAKES #DLFRONTBACK #KYCSTUFF #USADLPHOTOS #USADLSCAN #YOUNGFULLZ
we provide a greater variety while ensuring exceptional value
Hello People, I am Monalisa from Washington, USA. I highly recommend the service of JHADDIX ETHICAL HACKER'S Recovery to everyone who wishes to recover lost money either bitcoin or other cryptocurrencies, wallet hackers, or if you ever sent bitcoins to the wrong wallet address. I was able to recover my lost bitcoins from online swindlers in less than 24 hours after contacting JHADDIX ETHICAL HACKER'S recovery. They are the best professional team of prolific experts, each with their own unique skill set and a shared passion for unravelling the mysteries of lost crypto. They're not just JHADDIX ETHICAL HACKER'S ; they're blockchain detectives, forensic analysts, and digital strategists, all rolled into one. I’m truly thankful for their help in recovering all I lost. I have encountered numerous challenges and triumphs in my life. However, one of the most daunting experiences I faced was the loss of my hard-earned bitcoins to online swindlers. It was a distressing situation that left me feeling helpless and vulnerable. Fortunately, my encounter with JHADDIX ETHICAL HACKER'S Recovery proved to be a game-changer, as they swiftly and efficiently assisted me in recovering my lost funds. Their exceptional service and professionalism have left an indelible impression on me, prompting me to share my experience and recommend their services to anyone facing similar predicaments. JHADDIX ETHICAL HACKER'S Recovery is a distinguished service that specializes in the recovery of lost cryptocurrencies, addressing wallet hackers, and resolving issues related to incorrect wallet addresses. My personal encounter with this remarkable team of experts was nothing short of impressive. Within or less than 24 hours of reaching out to JHADDIX ETHICAL HACKER'S
ReplyDeleteEmail : jhaddixethicalhacker@gmail.com
WHATSAPP :+1 (672) 2173274
WEBSITE: jhaddixethicalhacker@gmail.com
I believe meeting you Dr Benjamin on the internet is the best miracle of my life, It came as a fairytale to me when I saw numerous testimonies on how he had helped a lot of people win the lottery jackpot by giving them the winning numbers so I decided to give it try by reaching out to him, I explained to him what I wanted and he assured me that he's a specialist on all kinds of spell that he's gonna help me win the Mega Million jackpot as he has always done for others, I believed him and follow all the instructions and processes he prepared for me after 48 hours he gave me the Mega Million jackpot lottery numbers and I won the jackpot of $610,000,000. I want the universe to join me to appreciate you Dr Benjamin for changing my life with his magic numbers. If you want to win the lottery jackpot I'll confidently recommend Dr Benjamin he's the best I have ever seen, here are his contact information. WhatsApp him +18588585788 or email him drbenjaminlottospell711@gmail.com
ReplyDeleteLaw assignments often require deep research and precise understanding, which can be challenging for students. Online Law Assignment Help in UK offers expert assistance that ensures well-structured, high-quality work tailored to academic standards. Their timely support helps students stay on track and reduce stress. It’s a dependable solution for achieving better grades while improving subject knowledge
ReplyDeleteAcademic success becomes easier with expert guidance from experienced professionals who understand students’ needs. They provide detailed research, plagiarism-free work, and timely support to help students perform with confidence. Their friendly and professional approach ensures a smooth learning experience for every learner. Choosing assignment help for nursing students UK is a smart way to reduce stress and achieve higher academic results efficiently.
ReplyDeleteUnderstanding marketing theories and completing assignments on time can become overwhelming for many students. Assignment Help Manchester offers trusted academic guidance that helps students handle challenging topics with greater ease and confidence. Experienced professionals provide well-researched, properly formatted, and plagiarism-free solutions that align with university expectations. Their timely assistance not only improves assignment quality but also helps students build stronger knowledge and achieve better academic success.
ReplyDeleteAll the bag designs looks beautiful. Indecent Exposure Laws
ReplyDeleteEnjoy a premium stay at The White Ibis, the top hotel in Sivasagar known for quality service and elegant interiors. top hotel in Sivasagar.
ReplyDeleteBusinesses that need professional accounting services New York can explore the expertise of Preesha Global for accurate financial management and reporting. accounting services New York
ReplyDeleteAnyone interested in a futures and options course in ghaziabad should explore Share Market Skills, as their training focuses on real market scenarios and risk management.futures and options course in ghaziabad
ReplyDelete