Saturday, November 15, 2008

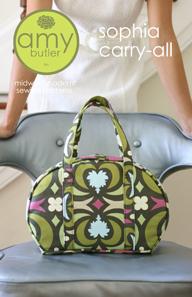
The Sophia Bag


Pattern Review
Pattern: Amy Butler’s Sophia Bag
Description: Inspired by romantic travel films of the early 60s. Stroll around town with this comfortably sized carry-all

Sizing: One Size

Instructions: The instructions are very thorough and helpful. Be sure to read each and every step, I know this from experience. I hand sewed the lining around the zipper and looked at the inside of my bag. Something wasn’t right, the lining was hanging down to far. I went back and checked the instructions, I left out a step, tacking the lining seam to the bag seam. So I unsewed, tacked the lining and the hand stitched the lining again.

Likes/Dislikes: I really like the look and the shape of this bag, it is so timeless. I also like the long zipper, that helps in getting into the bag.

The only dislike, I want to make several for Christmas gifts, but I am not sure I will have time. This bag does take some time to cut out, fuse the interfacing and construct. I think I at least 6 hours in this bag.

Changes: I did make several changes:

The main change was substituting Peltex for fusible fleece on the side panels and the edge panels (the panel below the zipper). I wanted a stiffer bag than the fusible would present and the Peltex seemed like the best solution. It was, I am quite pleased on how the bag holds it shape. I did trim away the extra Peltex from the seam allowance.


Another change, I used plastic canvas in the bottom of the bag and used bag feet. I read this on a blog and it was a great idea.

Thanks to the reviews on Pattern Review, I left off the piping at the bottom, much easier to sew.

Also, I added a pocket to one side between the handles. You need an outside pocket, right?


Fabric: I wanted a quilting cotton that was timeless as the bag. Also, I didn’t want a trendy fabric that would go out-of-style. Too much work is put into this bag for it to be so last year quickly!

If you plan on making the Sophia bag, and you should it is a great bag, pick out your zipper first. It is a 22” purse zipper and the color selection is limited. If you pick out a fabric with a unique color scheme you may not be able to find a zipper to match.

Conclusion: A wonderful bag with a fabulous shape. Amy Butler designed such a winner here. I cut out the Weekender yesterday so I could have houndstooth luggage set.

Oh, yes, invest in a piping foot or a welt piping foot? That will aid in the construction of this bag, the piping fits right into the groove and you can guide all these layers much easier.

BTW, if you have the Weekender pattern, can you look on the back and tell me what pattern is in the SUV? I think it was one of Amy Butler’s first patterns, the duffel or something like that? I would like to find a copy and make that so I would have a 3-piece houndstooth set

Friday, November 14, 2008

I Have Been Sewing

Here are a few pictures of part of my sewing this past week. I will post individual posts and reviews for each item, probably one post per day for 4 days. Very scientific, right!

First, Amy Butler's Sophia Bag. I can't even begin to say enough great things about this bag. It is wonderful all around. I will tell you all about the construction and my changes tomorrow. I go to my friend's quilt shop on Friday afternoons after work and cut out large projects. She has this huge cutting table, 4' x 8' probably, I cut out the Sophia last Friday and I cut out Amy Butler's Weekender Bag today. It is so fun to visit with my friend and we do something sewing related. She cut out her Sophia today.


Some crafting but not great pictures - A cupcake pincushion, pattern by Sandi Henderson. I will take better pictures for my review post.


BWOF #114, 10/2008, this is a great top.


Now if you want to sew-a-long, head to Episode 38 of the Sew Forth Now podcast and join. We are making the Franzi vest from Burda Style website. I hope there are others participating. One thing for sure, I will be using Burda Style for a pattern resource more often, this was very easy to print and put together. More details later.


That is just what I remembered to take pictures. The following is a complete list:


  • 6 potholders and 6 notecards for a swap

  • Put binding on Meredith's quilt which just came back from the machine quilter

  • Helped Meredith make 4 placemats for Christmas

  • Helped Meredith make a clock from Pretty Little Patchwork

  • Cut out fabric from Meredith to make another quilt, she has the blocks sewn together and is ready to set the blocks together. She will be doing that tomorrow, the quilt has to go to the quilter on Monday.

  • Bought some fabric and I am prewashing it right now.

Up next, a BWOF trench coat.


Sunday, November 02, 2008

Fall Color

Today has been a busy, busy day and right now I am taking full advantage of the fall back for the time change!!
The twins helped me clean up the flowers and the yard, so I rewarded them by a fall picnic. Not many November 1st around here are 70 degrees. We drove about 15 miles to a historic covered bridge. Here is the view from our picnic spot.


Thanks to some local citizens the bridge was saved during the floods in July. These brave people went on the bridge and removed some of the siding. Why? Well, the creek was so flooded the water was as high as the bridge, even a foot or two above the bottom of the bridge. With the siding removed, the water was able to flow through the bridge, thus saving the bridge. A bridge in the same area (over 100 years old) was not so fortunate. This picture will give you an idea of how high the water was.


Another picture of some fall color:


The rest of my day? Out to dinner with some girlfriends and a trip to Joann's with them. They got a huge laugh at this, as none of them sew but one friend wanted home dec fabric to recover dining room chairs. I had to figure the yardage!

Back home by 8 and I went to scrapbooking. A couple of days ago, I spread it out all over the dining room table. Tonight I have all the pictures in the album and have a bit of journaling to do. February to June are all in the album, now to print off more pictures. I did make an 8 x 8 album just of dd #2's graduation.

Saturday, November 01, 2008

The Lining

Snapped a few quick pictures of the lining before I headed out for the day. Unfortunately, I am not wearing the coat today, temperatures are going to be almost 70. That is a good day, to spend getting my flower garden ready for winter. I told the twins they were helping, boy, were they thrilled!!


Friday, October 31, 2008

Vogue 2614


Pattern Review

Pattern: Vogue 2614

Description: Misses liined jacket with collar variations, shoulder pads and long 2 pieced effect sleeves. I made View B with has a tab and inside button closing.

Sizing: 6 to 22, I made a 12. I bought this pattern 2-3 years ago and bought th 12, 14, 16 size range. I could have made a size 10, it does run a bit big but this is for outerwear and I would rather have the extra room. Now I can layer a sweater under the jacket and I won’t be uncomfortable.

Instructions: They were good, I have to say, I do get tired of hunting all around 7 pages of instructions for your specific view. On a whole the instructions were very good and helpful throughout the construction.

Likes/Dislikes: I liked the look. I wanted a short coat for the fall season and I had a couple of choices in mind. I remembered this pattern and thought the fabric and style would be perfect. I like the length, the collar and the style.

No dislikes other than I wish I could make a lapel better.

Changes:
Added 1” to the body and the sleeves.

Fabric: A quilted outerwear from Joann’s. The lining was from stash, Stacy of Stacy Sews, sent it to me awhile back. Thanks, Stacy, it was perfect for the jacket. I will have to get a picture, it is so pretty and fun. I made a special trip to Joann’s but their buckles were too wide. I didn’t want to wait to order one, the jacket was so close to being completed and patience I do not have! Then I thought of the shoe repair shop in my small town (also repairs tack). I went in and described what I wanted. He named a type of buckle, then asked the size and then bronze or silver. Out came the perfect buckle and he removed the prong, too. $1.50 for my buckle, I will have to remember that next time.

Conclusion
: A fun jacket, perfect weight and similar to one in a recent BWOF magazine.


View A is very similar to this $1325 jacket
Thanks for the compliments on the jack-o-lanterns. The top one is mine, made from this kit. The kit comes with a plastic drill, chisel type cutter and clear marbles. I just poked holes with the dril, pushed in a marble and chiseled some of the pumpkin out to make it look like argyle. Took 10 minutes top.