Not sure which number this is, I think #7. In my earlier tally, I forgot about my first Weekender, made for Paige while she was in college. I cheated and did not put in Peltex, needless to say it wasn’t that impressive
This one is for a friend, she did something very sweet for Jesse and I wanted to say Thank You!
The above picture was in the direct sunlight and maybe a bit too bright. Here is one from the shade:
Then with the scraps I made her the Alice Book Bag
Now for the set:
I have found 30” non-separating zippers at Purl Soho in many colors. That was a great find and it will be so much easier to order online than driving all around to find maybe a black and tan!
Popular Posts
Monday, June 25, 2012
Weekender Bag–Yes, Again
Labels:
Alice Book Bag,
Amy Butler,
bag,
bags,
purse,
Sewing,
weekender bag
Sunday, June 24, 2012
Simplicity 2226–Leopard Linen
Yes, after all the bag/purse/tote sewing, I do remember how to sew garments!
Kaitlyn and I picked up some leopard linen for Meredith and I thought it would be perfect made into a skirt. I pulled out Simplicity 2226 for the skirt, made here and reviewed here, The first time it was too big for Meredith, thank goodness for the tie, that helped the skirt fit around her waist.
Since that last skirt, Meredith has lost some weight, due to track and a very busy summer schedule. With that in mind, I went down two sizes. This change made the skirt fit perfectly.
Front view:
Pocket:
*******************************************************************************Since I have quit my job in April, I have become very busy sewing for others. Anywhere from bags to embroidery to altering equestrian vests. It has been perfect and I am enjoying all the various projects. So now, I am back to the sewing room for an embroidery job.
Tuesday, June 19, 2012
Rose–A Messenger Bag
For the past couple of weeks, I have been thinking about designing a bag, then writing instructions. So finally, I put the design to paper, did a couple of test bags and then the hard part….. writing instructions. Publisher was a great asset in illustrations.
So let me present hopefully what will become Rose a pattern from Girls in the Garden Pattern Company.
Now the back is the feature I really wanted in a bag
Then add a cute fastener for the strap
The bag is 10 x 12 x 3.
I have written the instructions, added illustrations and read through it several times,hoping it is all clear and concise. Next step is pattern testers, which I think five would be a good number. If this is something that would interest you, email me and I will send you the pattern instructions.
*****************************************************************************
Update: Thank you for the responses, I have enough pattern testers. I do need Maureen to email me, you were one of the first ones to ask to pattern test but you are a non-reply commenter, so I could not email you the pattern.
Monday, June 18, 2012
Bella Bag–Fig Tree Pattern
Yes, I made another bag! Not a surprise of late, right? I have had this one almost complete for a couple of weeks now but needed to get purse handles.
It is a Fig Tree Pattern
and I have always liked the look of this one. The purchased handles, interchangeable tie and shape.
My bag doesn’t have the firmness I like in a purse/tote so the bottom sags some. I will change this up the next time I make it and add some peltex to the front, back and bottom. On the sides, I will leave them as the pattern states, they need to have softness to pleat on the sides.
The pattern does not have pattern pieces, just measurements to cute the basic shapes then there are small drawings in the pattern instructions to trace. You take the tracings and shape the sides of the pieces. Not my favorite thing at all but it states in the instructions, saving some costs on the pattern. I would have rather paid a few extra dollars for the pattern pieces.
It also states purse handles available on the site, which is true but currently only in red polka dots. These are very cute, but wouldn’t work with my colorway.
I found my handles at Joann’s and decided they would work perfectly. Instead of attaching another tab, I just used the tie tabs and fastened the handles to these
All in all, I LOVE my purse, seldom to I keep a bag I make but this one I knew was mine from the start. I had some linen in my stash for the main body of the purse, adding a bit of quilting cotton that was pretty basic to the sides. Now I can make several ties and really change up the bag as I want.
Sunday, June 17, 2012
Happy Father’s Day
To my Dad, one of the greatest men I know.
To my husband, a great man and a great dad
Here’s the entire family for my husband on Father’s Day (pictures back from wedding photographer)
Then this one has nothing to do with Father’s Day but you can see my dress and it is a good picture of me!
Enjoy the day. We will be celebrating with a bbq and homemade ice cream later.
Sunday, June 10, 2012
Mom–Daughter Sewing Time
Meredith wanted to do a bit of sewing on Saturday and I convinced her to making a bag. This was the last new pattern from my recent bag/purse buying spree. It is from Tiny Seamstress Designs and called
Little Miss Business Bag Pattern
Photo from Tiny Seamstress Designs site
I helped her a bit, did the ruffle on my machine with my ruffler, interpreted the instructions, etc.
I think she did a fabulous job and Meredith was so pleased on how quickly it went together. Two changes, we made the ruffle smaller and I used peltex on the lining to give this big bag some support.
While Meredith worked on this bag, I worked on her Kimi Rose pattern with the fabric she picked out. Which is called Crazy Love by Jennifer Paganelli and I think it has a 60’s vibe.
I am really proud of Meredith, as her sewing skills continue to improve and it was fun to spend the afternoon in the sewing room with her.
Note: Both pictures were taken with Meredith’s camera phone.
*****************************************************************************
Meredith had to work today,so it was Kaitlyn – Mom time at Joann’s and other shopping errands. I restocked on Peltex, fusible fleece and SF-101 from all this bag making. Two more to go, a Kimi Rose for Erin and another Weekender for a friend.
And I did buy four pieces of fabric at Joann’s, garments here I come.
Friday, June 08, 2012
Frames–Brightened with Spray Paint
I have this mudroom area and it needed a bit of updating.
I don’t have a great before picture but you can see a bit of the room over Meredith’s shoulder (right side) in this picture
First, I tackled the wall color – using Valspar Sheer Light (a blue) same as family room)
On the wall are many cross-stitch samplers, most made by my mom, some by me and one by Paige when she was 12. These are very special to me, representing many hours of hard work, a labor of love.
Problem, the frames are dated, mismatched and some scraped up. Take a look
I decided a bit of spray paint would do the trick
I think the wall looks great, what do you think?
One is suppose to be orange but it looks a bit too red, so I am going to look for another can of orange and redo those few frames. I am so pleased with the update.
Thursday, June 07, 2012
Sunday, June 03, 2012
Hoot-n-Nanny Tote by Two Peas in a Pod
This one is for Meredith, she saw the pattern and liked the graphic owl on a bag.
Description: A modern and fun twist on the classic bucket tote. Patchwork and applique techniques make this tote stand out!
Finished size: 13.5″w x 8″ (excluding handles)
Instructions: This would be a great pattern for a newbie sewer or new to bag sewing. Great instructions, many photos and an easy bag to construct.
Fabric: osnaburg for the base with quilting cotton scraps
Changes: The instructions have you cut your scraps into 3-3/4” strips for the border of the bag and 4” for the handles. It would be easier to cut them all at the 4”, having a nice assortment of scraps for the border and handles. Seemed silly to me to have scraps with a 1/4” difference.
I also shortened the handles, pattern called for 28”, I used 22” handles.
Conclusion: Cute and quick bag with a fun applique. I enjoyed using some of my scraps for this bag. The owl applique was a fun addition to a basic bag pattern but not sure I needed to invest in the pattern for a very basic bag. The most important part, Meredith is thrilled with her new bag and that is all that matters.
You have probably noticed, no fashion sewing here. I have a backlog of purses to complete plus I really need to fashion fabric shop. My stash is low, just few of pieces and I am not too inspired by those right now.
Saturday, June 02, 2012
State Street Tote by Bari J
Description: The State Street Tote Pattern by Bari J. is a unique bag that can be made in patchwork or 2 contrasting fabrics. There are instructions for a spring closure or a magnetic fastener and this pattern is easy to make. Take a look at Bari J patterns
Finished Size: 13" W x 13" W x 3"
Instructions: Very thorough, the instructions come in a booklet form, all in full color with multiple pictures and graphics throughout. I thought they were easy to follow and concise.
Changes: I shortened the handles and changed the order on one step. She suggests to use plastic canvas and purse feet to make the bottom of the bag sturdy. The instructions state to sew the lining and the bag together at the top. Turn, press and edge stitch the top. Then insert the plastic canvas through the opening in the bottom of the lining. I thought this would be a bit cumbersome to reach through the lining all the time to attach the feet. I moved this step to before attaching the lining. It was not difficult at all to pull the bag through the lining with the plastic canvas already in place.
At the top of the bag I made about a 1” seam allowance. I did not like how much the second fabric was above the base of the main fabric.
One more change was to change the seam allowances to 1/2” on the bag instead of 1/4”. There are too many layers of fabric, fleece, interfacing, etc and I didn’t want to risk not catching something with a 1/4” seam allowance
Fabric: One bag from Amy Butler's Daisy Chain fabric line and the other was Flora by Lauren and Jessi Jung for Moda
Conclusion: A fun bag to make, with some fun pocket options, perfect size and a pattern you can use a variety of fabric combinations.
First bag from Amy Butler’s fabric
On this bag, my lining was a bit long (must of cut wrong) so I used the extra lining to make a faux binding
Inside pocket
Now for the best feature of this bag – the outside pocket – on both sides of the bag
I can drop my keys and phone in these and be able to find them quickly. The instructions have you stitch a line 2” from the sides and bottom of the two fabrics. In this case the gray floral and white floral. This makes the pocket enclosed and your belongings want wonder all around the outside of the bag. You can see one of my chalk lines on the right side of the bag.
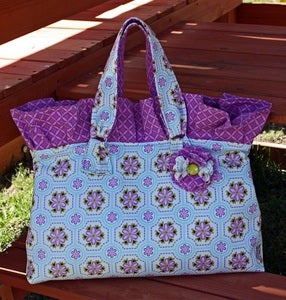
Now for the Flora fabric bag(handles are from another line but I liked the look of the polka dot handles)
I really liked the fabric when I purchased it but the bag is just a bit boring, so I added a flower
I don’t think this what I am looking for but it does help the bag. Any suggestions?
Here is the inside
I found a new-to-me blog Amy Lou Who Sews and she is having a Purse Palooza which is hosted over at Sew Sweetness. This looks fun and informative. Speaking of informative, check out this post on at Sew Sweetness all bout bag interfacing. I am going to get some new interfacings to try out.
Friday, June 01, 2012
Honey Girl Dress–Jamie Christina Pattern
Description and sizes: delightful dress pattern that celebrates everything fun about being a girl. The Honey Girl pattern comes with complete instructions, illustrations, and full size pattern pieces to make a shirred sun dress or shirred top. Instructions on how to shirr with elastic thread are also included in the pattern. Sizes are as follows: Small (size 4 - 6), medium (sizes 8 - 10), large (sizes 12 - 14), and X Large (sizes 16 - 18). Jamie Christina Patterns and blog
Fabric: An Amy Butler quilting cotton
Changes: The front ruffle had bias binding for the edges, I cut out another front ruffle, added pink rick-rack for embellishment
The pattern calls for 1/4” elastic at the top of the bodice and then form a casing between the bodice and the skirt. I added the elastic at the top of the bodice but omitted it at the skirt section. This was my fault, I serged the bodice-skirt seam and did not leave enough seam allowance to make the casing. That is what I get for sewing before reading. I think with all the serging, the dress will stay in place without this 1/4” elastic
The instructions have you ruffle fabric down the middle of the 2” fabric and apply to the top of the skirt hem. I changed this and used a ruffle like I did on my Sew Serendipity skirt. I am very pleased with the result
Jamie Christina has a good shirring tutorial. I have to change one thing for the elastic thread to work on my machine. I have to wind the bobbin on my machine. If I hand wind, I get no shirring while sewing.
Conclusion: A fun, summery dress for Meredith. It is a perfect style on her and all of us love the fabric.
*******************************************************************************
From all the comments on machine repair, everyone hates to be without their machines and many have a back-up machine.
I am happy to report, I picked up my machine yesterday. They had all the parts in stock and that helped with the speed of repair. I was shocked when they called, as when I took it in they said it would be a couple of weeks. Thanks, Marilyn, for the quick repair.
Subscribe to:
Posts (Atom)