Tuesday, March 29, 2011

Simplicity 2313

Another gray jacket, this time for Erin.  She is need of some lightweight spring coats/jackets.  I had another piece of gray (a bit lighter in color than my new military jacket) and thougth it would work for  Simplicity 2313, View A, the blue one on the pattern envelope


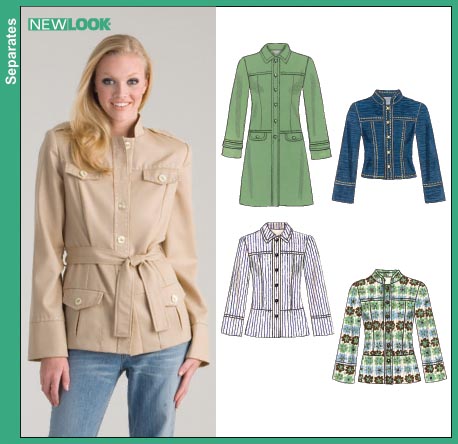
Pattern description:  Misses' jackets with detail and collar variations. Optional details include button tabs, ruffled fronts, pleated collar and cuffs, elasticized cuffs, drawstring collar, zipper front

Sizing: 6 to 24

Instructions:  They are very good.  Simplicity gives detailed written instructions plus illustrations for this pattern.  The instructions are very good for the pocket which is a bit unique in design.  It is built into the princess seaming of the jacket.  First step is to construct the pocket flap and attach it to the front panel:
Then you attach one of the pockets to this piece and then other pocket to the side front.  I did notice you need to make sure the pocket on the side piece is sewn in the correct place.  This seam needs to be below the pocket flap, or the seam will show:

You can see the seam here,

I had to unsew this seam and do some adjusting.  My adjustment was to use a 5/8" seam on the pocket and a 1/4" seam on the side front.  This helped to lower the pocket-side front seam and place it visually below the pocket flap.

This jacket is unlined and I really like how the front facing piece (same as the front piece) is shaped.  This hides all the seaming from the pockets and gives you a much cleaner finish.
I used the this tutorial (one I had posted earlier) for the interfacing and a clean edge on the facing. 

Likes/Dislkes:  I was digging through my pattern stash looking for a lightweight jacket pattern and discovered I really don't have too many.  This one won for a couple of reasons: 1.  I didn't need a zipper (mine have all disappeared since Meredith has been making zipper jewelry.  2.  the fabric requirements were close to my yardage 3. looked appropriate for a 21 year-old
The pattern had great structure and some stylish details

I also liked the back tab details, the belt look without having to deal with a belt


Changes:  The only one was to eliminate the wide elastic cuff on the sleeve.  The reason - I did not have enough fabric, short by 2", so I added 1" to the sleeve cut line on View C and that worked perfectly.  My daughter and I wear the same size.  She has a bit broader shoulders and is a couple inches shorter.  The sleeves are too short for my, so they will be just right for her :).  On my dressform and on me, the shoulders are a bit wider on this jacket, so I think the fit will be perfect for her.

Conclusion:  My daughter is thrilled to have another jacket besides her Columbia fleece jacket.  This will look stylish when she is going to work or great for a more casual weekend look.

I have fabric and a zipper (hidden from Meredith) for View B, which is for me.  That will wait a few days, I have a couple more gray pieces of fabric to sew up.   It must be the winter weather hanging around here making me want to sew gray fabric.

These pictures were taken with a flash and an overhead light, so a bit of light bouncing off the fabric. 

Back:

Collar detail:


 Close-up of collar:


Front:

Sunday, March 27, 2011

New Look 6617


** Added a picture of me wearing coat  at bottom of post**
Pattern Description: Misses' unlined jacket in 3 lengths, two collar options.


Sizing: 6 to 16

Instructions:  They are very good, concise and easy to follow.  The pattern includes several options to create a jacket with many different details.  With this in mind, I found the directions to have a nice order.

Likes/Dislikes:  I wanted a lightweight spring jacket with military influences.  This pattern was just what I had in mind.  I have had it in my pattern collection for quite sometime, happy to finally use it.  The long cuffs were a nice detail, too.


Here is the pockets:


Changes:  Only adding length to the sleeve.

Fabric:  A cotton twill or drill type of fabric, found it a Wal-Mart on Thursday for $1.50 a yard.  My buttons were the highest priced items to this jacket.  I went to Joann's this morning to find buttons, these were the only choice with 12 buttons in stock.  $4.00 a card but I had several coupons and then a 25% off the total purchase.  The fabric wrinkles a bit when handled but I don't mind that too much, it


Conclusion:  This pattern has many pieces and took me quite awhile to cut out but it was so worth it.  I really liked how the pattern went together and the finished garment turned out better than the picture in my head (which is always a good thing). Hoping the weather cooperates so I can wear my new jacket this week

the jacket has funny drag lines in this picture, I didn't take much time outside arranging it on my dressform - too cold!

Look at the picture above- I sewed the cuff tab backwards on one of the sleeves!  Oops have to fix that.


Monday, March 21, 2011

Opinions Please for Simplicity 2250

I originally purchased this pattern for Meredith, the dress looks just like her, then the cardigan caught my eye.


.  The recommended fabrics are:

So does anyone have any good ideas on fabric?  I was thinking a lightweight denim but not positive.

Suggestions, please?

**********************************************************************************

On a sad note, please keep my friend, Anne, owner of Needle Nook Fabrics in your thoughts. Here is her blogpost

Sunday, March 20, 2011

Pictures and an Award

Thanks to Trini for this award, I am so appreciative and she listed some incredible bloggers and their garments on her nominations.  She nominated me for my Cabi-Channel inspired jacket, which I wore today.


Here are a couple of pictures


I am passing this award to all my sewing friends, they are all so stylish (and inspiring). 

Friday, March 18, 2011

Kitchen Redo - Painted Cabinets

Look at what a difference paint can make


Here are the befores for the kitchen, nice oak cabinets but after tweny years they were starting to show alot of wear.  Also, after installing the laminate floor, it was way too much wood on wood look for me.  Last year we installed a home office area at the opposite end of the sink.  Take a look at that post to see how it looks.  Fast  forward a year and in February I painted the bathroom vanity and it turned out so incredible.  Hubby said bathroom looks so good, you want to paint the kitchen cabinets?  He didn't have to say that twice!  So here are the before pictures:


like the bucket in the middle of the floor


To prepare the cabinets, I sanded them, applied Liquid sandpaper (deglosser), then three coats of Behr Plus paint (the one with primer) in satin enamel finish and the color was Antique White.  To finish it off I applied 3 coats of wipe-on poly.  I talked to a friend in town who paints and sells furniture, she recommended I do this and the paint would not chip. 
Here is the after pictures


The afternoon was overcast for the pictures  but still with the painted cabinets my kitchen is so much brighter.  In fact, our lighting is on a dimmer and we have to dim the lights a bit in the evenings.  Wonderful problem to have!  I am so happy, well more like thrilled and overjoyed with the transformation.  The power of paint, amazing what a gallon will do.  I have less than $100 in supplies for my cabinets and two weeks of painting time.

Future plans are to eventually replace the appliances in stainless steel.  The old dishwasher died in November, so we replaced it with stainless steel. 


I am sharing this on:
Updated June 30, 2011 to share on CSI Kitchen Makeover challenge
Visit thecsiproject.com

Thursday, March 17, 2011

A Few Projects for the Kitchen

Tomorrow I hope to have pictures of my painted kitchen cabinets, if the sun cooperates that is.

Until then, I used my Silhouette and vinly to redo somethings.

I bought these cute cannisters at Pier One, the black is chalkboard paint.  In reality, I was the cannisters off quite a bit and always have to write on them again.

So I cut vinyl for the wording, much better:


Years ago I purchased this sign at the a home party.  In the catalog I couldn't tell it was a green color, so I painted over it in black.  This was fine but I was ready for some color:

New paint and light gray lettering, much better for spring.


Monday, March 14, 2011

Onion 5039

Description: Top/tunic/mini dress with large collar and optional belt.  Also, sleeve variations and neck variations.

Sizing:  XS to XL.

Instructions:  The instructions are easy.  When you purchase this pattern at the Onion site, the English translated instructions are emailed to you in a PDF file.  This is very helpful since the pattern instructions are in Danish with no illustrations.  The pattern itself is mailed to you after purchase.   Each step is in a logical order with good translated wording.

The pattern does have you sew the side seams and the sleeve seam.  Then you attach the sleeve to the body of the garment in the round, unusual for a knit but necessary in this pattern, the sleeves have a nice gathered head.

Another step that is a bit different for a knit is the instructions state the when sewing the collar to the neckline, the neckline will be stretched to fit the collar.  This is for the drape, as stated on the pattern instructions.

Likes/Dislikes:  I liked the sweater/tunic look with a beautiful collar and long cuff for the sleeves.  No dislikes

Changes:  I wanted a length between the top and tunic length.  So I cut my top at 5" below the top length (which is about halfway between the two lengths).  I also did not have enough fabric to cut the belt.

One more thing to check - the width of the cuff.  Before sewing this onto the sleeve try it on your wrist and see if the fit is okay.  I think it will depend on the stretch of your knit fabric.

Fabric:  A ribbed knit from Fabric.com.  A bit lightweight but a nice drape.

Conclusion:  Well, it is snowing here today and I am so tired of winter and my winter clothes.  The twins have an orchestra concert tonight and I decided to sew this pattern this afternoon after I got home from work.  A new top will make me feel better about the snow and the never-ending winter.


This picture shows the sleeve detail and length

Better view of the front and drape.


I made a medium per the sizing on the pattern envelope.  I will go down to a small the next time.  This top is a bit bit and wide through the shoulders.  I do believe this rib knit will shrink after washing, I find this fabric to really stretch out-of-shape while constructing the garment.

Sunday, March 13, 2011

Butterick 5526 Again

This past week I made up Butterick 5526 again in a stripe shirting.  Here is the first blouse from the pattern. 

My sewing has been very limited as I have been painting my kitchen cabinets for the last couple of weeks.  I hope to be finished by Wednesday and I can begin to put everything back together.  One thing for sure, the change in my kitchen is amazing.

Pictures soon.

Tuesday, March 08, 2011

24 Years Today

My oldest is 24 today, where does time go?  We went to her house on Sunday for a celebration.
Birthday girl in the middle with her sisters
She fixed a wonderful lunch and we ate at her new table.  The new table, she and her husband built!  It has two leaves and can sit up to 12 people. 

Inspired from Pottery Barn and World Market - bolt is for industrial look.


table base
Happy Birthday to my wonderful girl!

Wednesday, March 02, 2011

Projects for March

I am working on Butterick 5313 for Meredith

She picked the yellow derss bodice with the blue dress skirt section.
Here it is so far:

I added an inch to the length but shouldn't have done that.  The dress looks too long and I need to take some off the skirt section.  This morning I basted on the ruffle so Meredith could try it on later today.  My dress form is at the smallest measurements, so close to Meredith's actual measurements. 

Other projects include painting my kitchen cabinets.  After finishing the bathroom vanity, I was so pleased with the transformation that I decided to tackle the kitchen.  Mike (hubby) was also in agreement, the cabinets were looking tired and worn so we started over the weekend.  It will take some time but will be worth it. 

Now off to sew with the 6th grade youth group - pajama shorts.