Friday, February 25, 2011

Before and After Vanity

I did some painting in the bathroom the last couple of weeks.  The cabinets were golden oak finish, about 20 years old and after 4 girls in this bathroom, showing some wear.

The bathroom is painted red and the new cabinet colors make the red look so much better.


Cabinet before


Vanity before

cabinet after

Vanity after
Sharing this on

Thursday, February 24, 2011

Silhouette Cards and More

It is snowing again and I can't seem to get motivated to sew the spring dress for Meredith.   Instead I did some things with my Silhouette Machine.

A card:

Then a crock my mom had in a closet (from her cow phase)


Using the Silhouette and some vinyl it became a cookie jar:

Monday, February 21, 2011

Butterick 5562

Description: From the envelope: Close-fitting, pullover tops have stitched hems. View D: draped, gathered, elasticized collar with long sleeves

Sizing: 4 to 26

Instructions:  Pretty good.  I had to read attaching the collar a couple of times and look at the illustration but then it all made sense. 

Likes/dislikes:  After seeing Shannon's and Amanda's and Sharon's, I knew I had to make this top.  The drape of the collar is gorgeous.

Changes:  I added 1" to sleeves and body, as always.  Several others on Pattern Review have made a casing for the elastic in the collar.  I set my serger for a wider stitch, then zig-zagged the elastic onto this seam.  I did end up taking up the side seams on my top, it does run a bit big.  This is decieving, as the finished measurements on the pattern piece indicate a close-fitting garment.

Fabric:  A lightweight, wonderful sweater-type knit.  Wished I could remember where I purchased it, I would buy more colors in this fabric (it sews like a dream and feels incredible)

Conclusion:  I really, really like my new top.  I did play with the collar quite a bit - wanted to see which way I liked wearing my top.

Here is the collar pulled lower, I really don't like this look on me frames the chest a bit too much :)

This is a better look for me, needed to drape the collar a bit better for the pictures.

hubby was taking the pictures and he wouldn't stop, so here is the collar in action.  I am heading to take my camera out of his hands!


Sunday, February 20, 2011

Burda 6/2008 #114


Description: Tshirt with sleeve variations and elaticised hembands.

Sizes: 38-46

Instructions: They were pretty easy to follow.  Burda has you sew on shoulder seam, then add the neck binding, followed by sewing the other shoulder seam.  I didn't follow this - sewed both should seams then adding the neck binding in the round.


The shoulders are interesting - more of a square inset sleeve.  This has the sleeves stitched in three parts. Sew the upper edge of the sleeves to the armholes, clip to front and back at corners.  then stitche the lower edge of the sleeves in the horizontal part of the armhole.  Finally, sew the underarm sleeve.  I thought this would be difficult but proved to be quite easy as long as you do it in the steps.

Likes/Dislikes:  I was looking for a pattern for my daughter, Erin.  This pattern reminded me of shirts she likes from Maurices and I had fabric in my stash that would work perfectly. 

I really had no dislikes, it went together easily and the finished garment looks great.

Changes:  I had planned on making view 114, but after finishing most of the garment, I decided not to put elastic in the sleeves.  Erin doesn't really care for elastic around her arms.

The only other change was the neckline changes mentioned above.

Fabric:  A border ITY print from fabric.com.  The border is very wide on both edges, so I was only able to cut the front and back from the main print.  I decided to cut the sleeves from the border - stretch going lengthwise (with very little stretch).  The sleeves have enough ease the stretch was not an issue.

Conclusion:  A cute top, perfect for spring.  Easy to construct and a bit different than a basic t-shirt.


Back

Front

Sleeve Detail

Tuesday, February 15, 2011

Cupcake Apron

I saw this cute apron On the Moda Lissa blog and thought it would be a fun sample for my friend's quilt shop.  It takes very little time to make but is super cute (great gift idea, too).

Here is my version:

Monday, February 14, 2011

Simplicity 3678 for Erin

This dress I made for my daughter, Erin.  Erin is currently student teaching in secondary math and as the weather warms up I thought she might want/need a new dress.  Orange is her favorite color, followed by aqua, this fabric was perfect.  Obviously, she will wear a camisole with this dress!  I thougth is was fun and youthful fabric, plus a great pattern.

I made this pattern for myself for her high school graduation.  Here is the review and the original blogpost.

*****************************************************************************

Now I am off to jury duty!

Wednesday, February 09, 2011

My Image M1005 Wrap Tunic


M1005 is the first one of row 2
Description: From My Image pattern magazine, winter issue 2010. This is design #M1005 for a Wrap tunic for knits with long sleeves.

Sizing: 36 to 44, I made a 38, corresponding to my Burda sizing

Instructions:  They were easy to follow, four pieces for this dress/tunic.  One thing I noticed on the instructions, the dart for pattern piece #1 is never mentioned.  So one of the first things I did was sew the dart.  Several steps are mentioned for the gathering of rigth front panel, matching the notches on the left front panel to the gathering and sewing the side seams, then sew the sleeves in the round. I did change the order a bit here:
  1. Baste the fronts together at the side seams
  2. Attach the sleeves (this is a knit and I did flat construction of the sleeves)
  3. Sew sleeve underarm seams and side seams in one
  4. Stitch hems
The translation for this design is pretty good.  On step 9, the instructions state:  "Make a seam in the sleeve", I believe they meant hem the sleeve.

Likes/dislikes:  I really liked the look of this pattern.  I have made the wrap top from several different patterns (namely Simplicity 4076) and like the look of this style on me.  I thought the wrap tunic/dress would be something a bit different.  My only dislike is the you have to lengthen the pattern pieces 1 and 3 by 18cm and if you needed to lengthen the tunic, you need to alter the piece #2 to match this.

On the fitting side - this fits fantastic, the front is high so good coverage, the drape and shirring is placed perfectly.  Also, if you look at the pattern pieces, they are drafted with nice curves.
See the back of my dress:

Fabric:  An ITY from fabric.com from the last knit sale

Changes:  Added 1" at the waist for pieces 1-3 for my long waist.  Added 1" to the sleeves.  Also, I inserted 1/8" elastic to the neckline, pulling in the neckline just a bit.

Conclusion:  I really like my new top, if fits like a dream, was quick to construct.  I think I can wear this several different ways:  with tights and boots (gotta check the length), leggings with boots or flats or with skinny jeans and boots ( maybe on this one).  With a cardigan, vest or jacket, too.

Front of dress hard to see the details


View of neckline and gathers


Gathers


I will get pictures of me wearing it soon.


Tuesday, February 08, 2011

New Look 6628


Anyone have an extra New Look 6628 they might be willing to part with?  This pattern is discontinued and not available on Simplicity's website (even in the New Look discontinued section).

After seeing Melissa's gorgeous sweater, I really *need* this pattern.

Thanks.

*******************************************************************************
On another note - Meredith went back to orthopedic doctor today and she can start taking off the brace some and be totally out of it by this weekend.  She was thrilled, especially when he said she could start playing basketball again next week.  I told her it was those young bones, they heal quickly!

Saturday, February 05, 2011

HP 1114 - New PIcture

Meredith took a quick picture of me in the new Hot Patterns top.  She stood in the doorway, I went on the porch for about one minute, just a bit chilly!  You like the 16" or so of snow in the background?

Friday, February 04, 2011

Hot Patterns 1114 - Mighty Aphrodite Draped T-shirt

Description: Semi-fitted hip-length T-Shirts have a gently shaped silhouette, a boat neck with an asymmetric pleated shoulder, and an adjustable, ruched and draped side seam feature. These T-shirts are designed so that you can mix up the sleeve details for maximum fashion mileage...a classic full length sleeve, with optional ruffled cuff and hem detail? No problem! Elbow-length draped sleeves for a chic, feminine look? Fine! What about a totally directional look with one draped and one classic full length sleeve? Why not! These dramatically styled and ridiculously flattering T-Shirts will work for day, evening, weekends and work, and they look amazing worn over a simple pencil skirt, a flat-front straight-cut pant, or your favorite jeans.
Sizing: 6 to 26

Instructions:  I found them good for every part but the pleats, I really had to fiddle with them to get the pleating in the right direction and all lined up.  I made this shirt twice in the last two days and the pleating wasn't easier the second time either but worth it in the end, it really makes the shirt.  In fact, I think doing the pleats almost took as long as the rest of the shirt construction.

After I had the pleats stitched and the front and back shoulder seams sewn, I thought the neckline looked way to wide and low.  This wasn't a concern after completing the top, the neckline drapes beautifully.

Likes/dislikes:  I have liked the look of this tshirt since the moment it came out, it just took me until December to get the pattern ordered.  The shirring is just fantastic.


Changes:  I added 1" to the sleeves.  I made one change on the black and blue version top, cut it out incorrectly.  So the pleats and shirring are opposite of the pattern envelope.  You cut the front out in one piece (no fold) so the right side needs to be up, well guess who didn't do that. 
Next time I will make the ties a few inches longer.

Fabric:  The blue and black floral piece is a jersey (with no lycra) from Denver Fabrics, the bold black/white and pink is an ITY from fabric.com.  I had just enough of this print to match the side seams and the sleeves, it is a wide stripe and I was happy I could cut out the sleeves so matched across the body


Conclusion:  This is a fantastic pattern with so many options for different looks. I am pleased with both tops but favor the black/white ITY top much more.  The fabric is better, has recovery and better drape.  Also, the blue/black floral is a bit thin and needs a cami.  I think the key to this top (well, any pattern for that matter) is the correct fabric.  I know I will wear the black/white version so much  more.

I have plans for the short sleeve version in a solid knit, that drape on the short-sleeve version is gorgeous.


Thursday, February 03, 2011

More Valentine Cards

I am so enjoying this cardmaking and made a list for Valentine's Day.  I am upto 13 cards made and I need a few more.

Here are the latest, most of the elements are cut with my Silhouette machine


Wednesday, February 02, 2011

Simplicity 2284

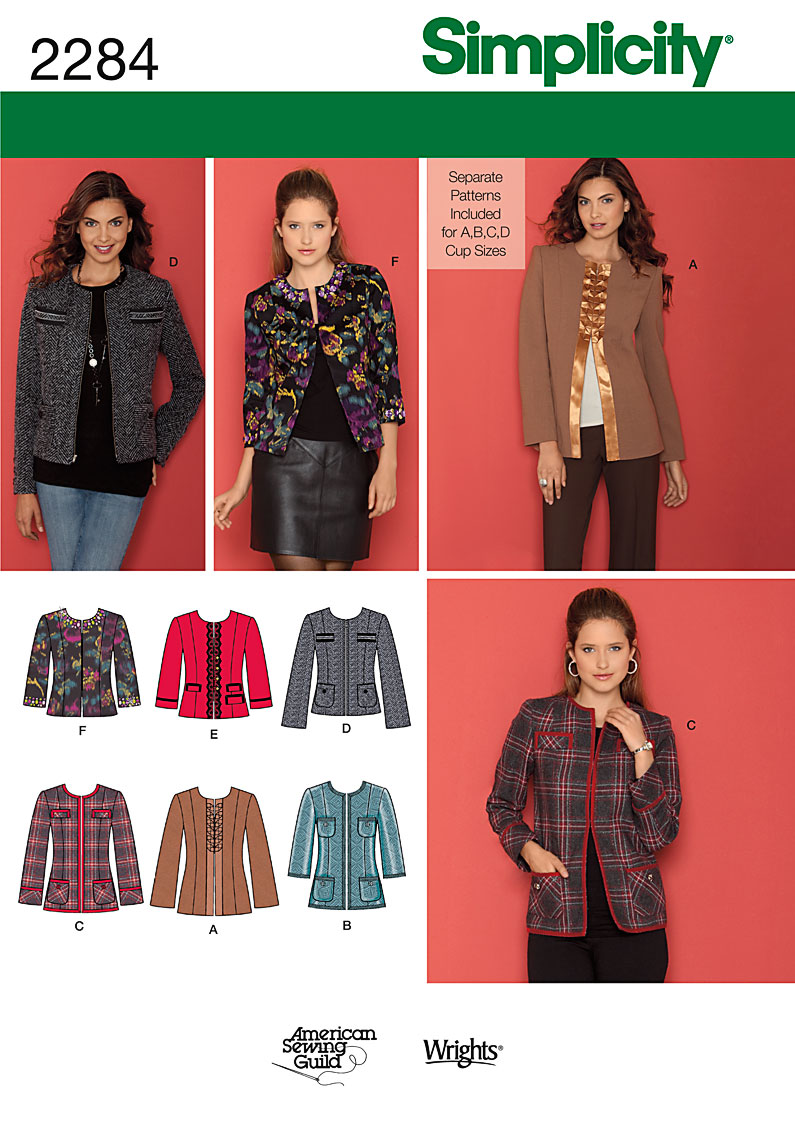
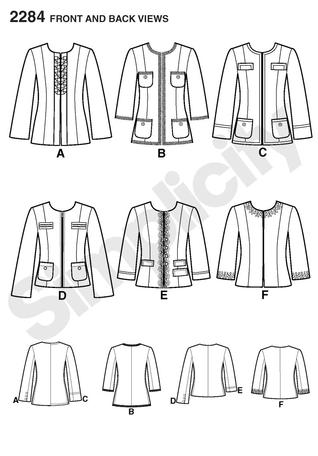
Description:  Misses' & Miss petite lined jacket in two lengths with trim variations… separate patterns included for A, B, C, D cup sizes.

Sizing: 6 to 24

Instructions:  They were really very good, even has instructions for sleeve heads.  I did follow most of their instructions but used this Ann R's tutorial at flickr for interfacing and sleeve heads

Here are my pictures from the inside

I stitched a basting line for the hem at the bottom


Likes/Distlikes:  I was trying to recreate this Cabi Jacket and I really thought this pattern was just the match.

I liked the construction, loved the cup sized pattern and the style.  the only thing I don't like (and it is my fault) is the narrow sleeves.  If I had looked at the pattern envelope I would have noticed the jacket is modeled with knit tops, probably sleeveless.    I wanted to be able to wear some blouses with my jacket, like the picture, but I will not be able to do this, not enough ease.  Other than that, I really like my jacket.

Changes:  I added 1" to the length of the jacket and the sleeves.  I also made my own fringe for this jacket.
I cut the fringe about 1-1/2" wide and unraveled on each side:
Then from the larger threads I unraveled, made a braid:


I used two layers of the fringe, then applied the braid to the fringe with a zigzag.  Then I applied the trim to the pockets and jacket with a zigzag.


Here you can see the two layers, makes the trim fluffier.

I found Threads article November 2005 #121, "Inside The Chanel Jacket", to be very helpful and the pictures of actual Chanel garment helped with trim placement.

The biggest news for me was I made a muslin of this pattern, something I don't do very often.  I knew the jacket would take some time to construct and I wanted to have the sizing correct. 

I also added hooks and eyes to close the jacket.

Fabric: Berry Tweed from Fashionista Fabrics

Conclusion:  I really like my jacket, it turned out even better than the picture in my head.  I do wish I could wear those blouses with it but I will just have to make another one.  After examining the Cabi picture, the sleeves on that jacket are much wider (or at least appear to be).  


 I lightened this photo a bit so you could see the details:


*********************************************************************************
We are at home, waiting for the snow plow, see no road:

It is in front of that barbed wire fence somewhere.  I am in now hurry, I know they will be by when they can, lots of roads in my county.